Stock Facilitator
Accessing a cloud service
Written by Dominique LopesIn our last session we've dealt with spring security to secure part of our application against unauthorized access.
Today, we want to …
- create an SQL database service in IBM Bluemix,
- make the service available within our application,
- tie the authentication mechanism from the last session to the cloud database (using a custom UserDetailsService) and
- enable database initialization via JPA and Hibernate.
Of course, we will run the application in our local environment and in the cloud.
A current high-level component based view of that application looked like this:
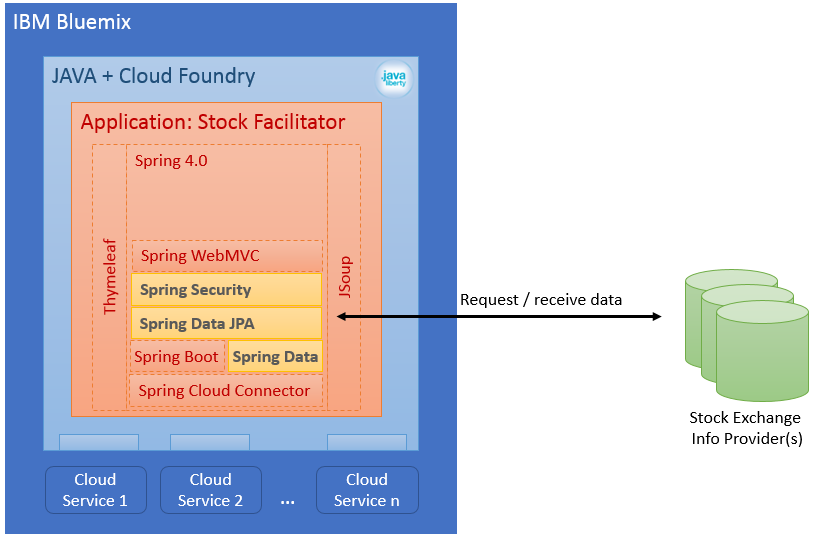
We have implemented the basic application structure already in the last session. What we are missing at the moment, is the usage of a database provided as a service by the cloud environment. Hence, our first step will be the setup of a database service in IBM Bluemix.
create SQL Database Service in Bluemix
In your Bluemix Account, go to the catalogue and select the category "Data & Analytics". You will find a whole bunch of services for different database types and from different vendors here. Some of these services are for free, others have to be paid.
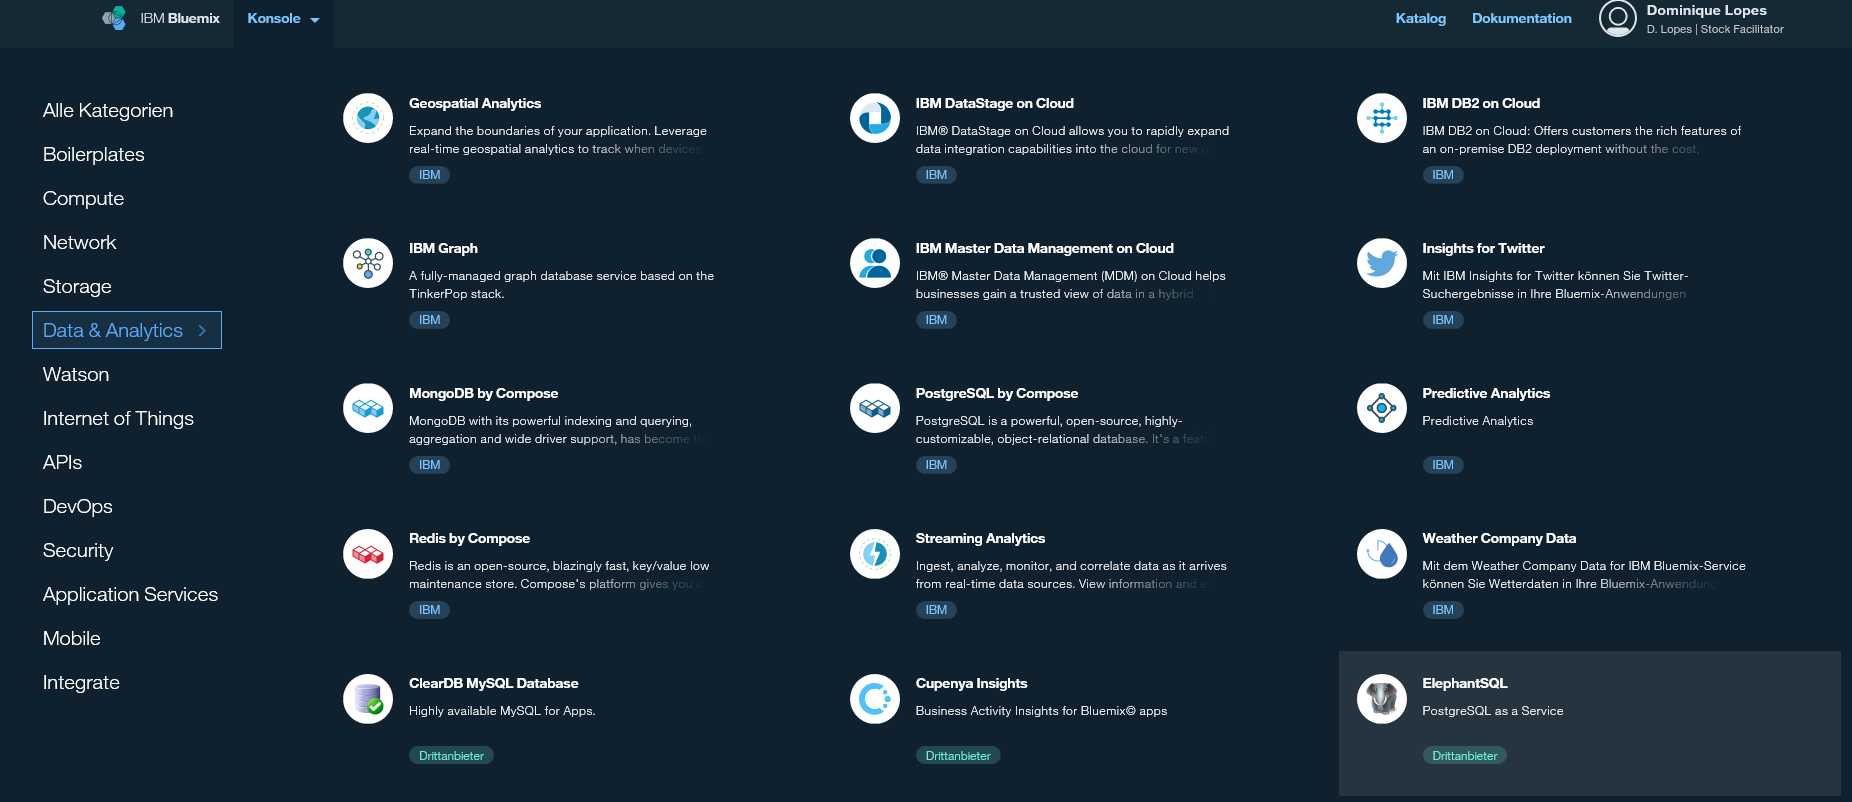
I chose the 3rd-party vendor ElephantSQL with the plan "tiny turtle" because it gives me a Postgres SQL database with 20 MB storage for free. That should do for my application. It is completely for you to decide which service fits best to you. It might be that you have different requirements regarding your service. In that case you might want to choose a different service.
So, after we have selected our desired service we need to select a service plan (as I said: I use "tiny turtle"):

After confirmation, our service was created and can be managed in several ways. At first, we want to give it proper name. Currently it is named genericly "ElephantSQL-1u", which does not conform to the naming I prefer. In the service's context menu you can find the rename task:
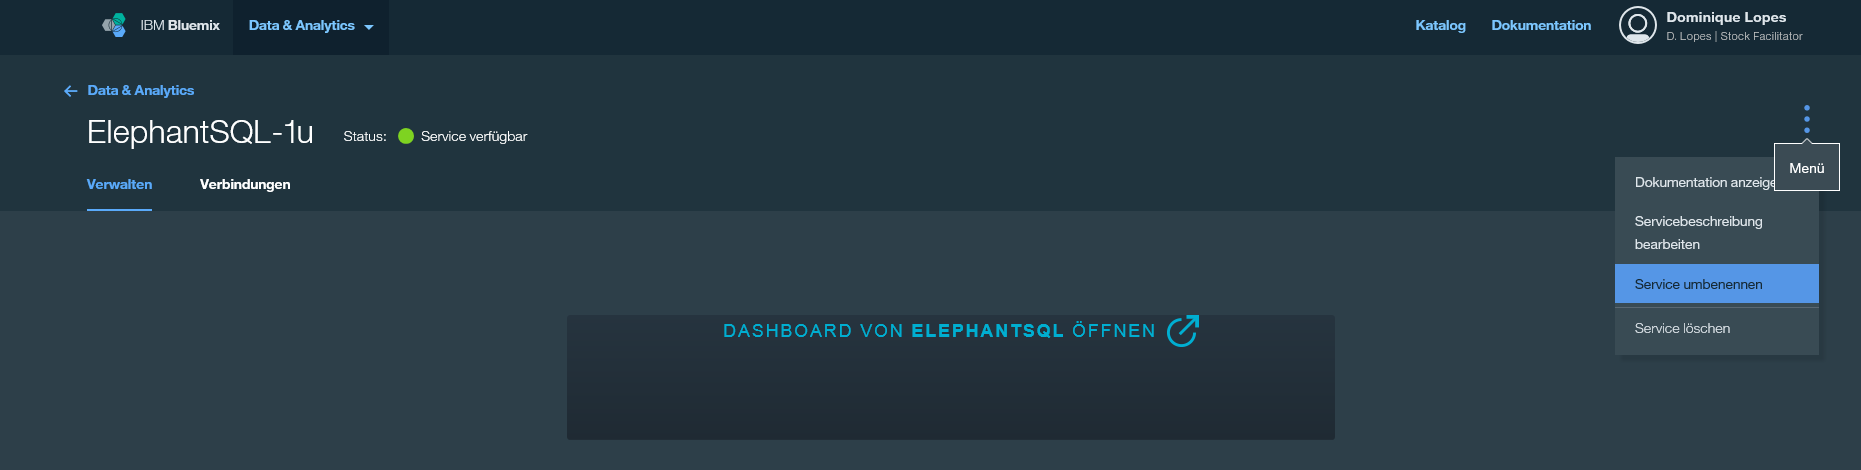
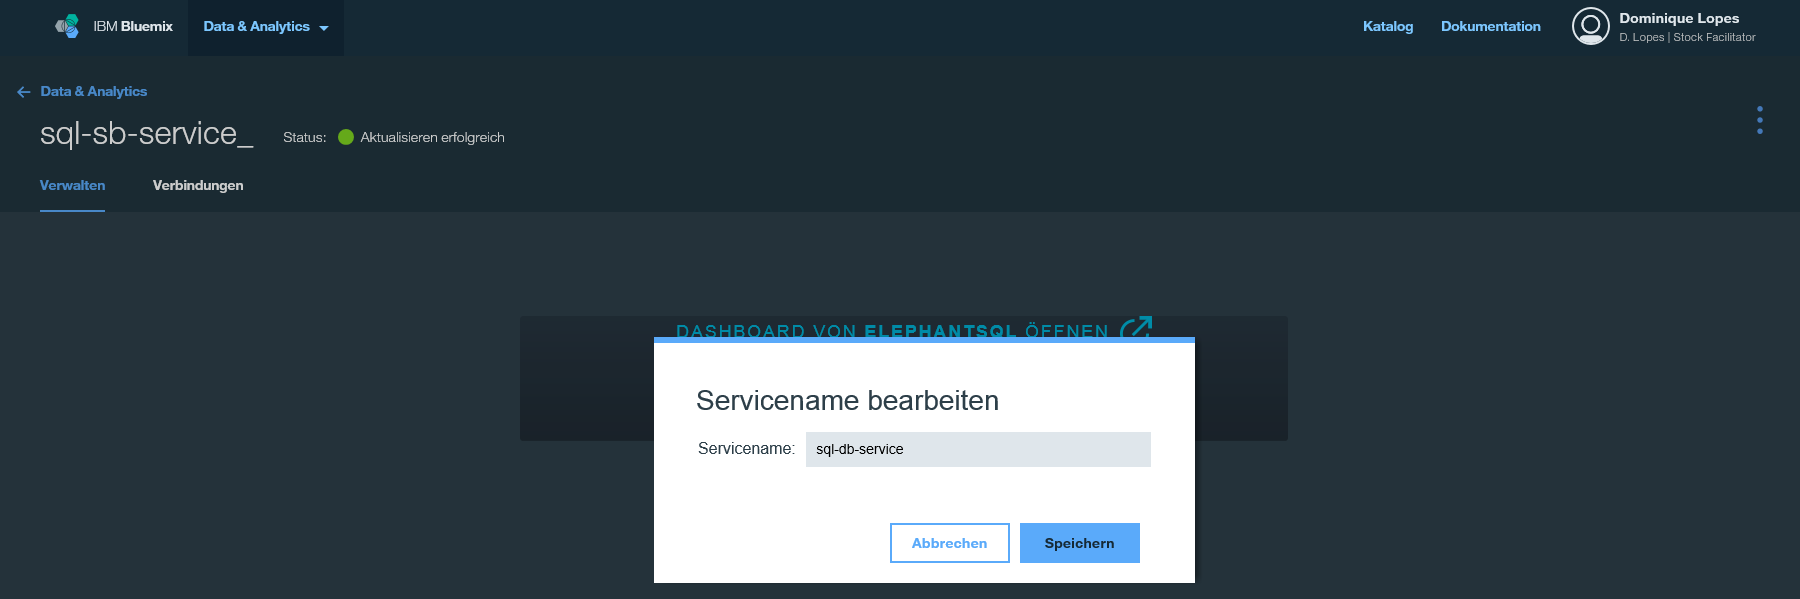
Rename the service to "sql-db-service" (remember, our cloud application shall be able to run in any cloud environment. We can't be sure that another cloud environment will provide ElephantSQL or a Postgres SQL database. However, we do know that we will need some kind of SQL database. Thus I chose a name that reflects our mimimal requirement for this service).
As a second step, we need to bind our new service to the StockFacilitator application. In order to do so, switch to the tab "Connections".
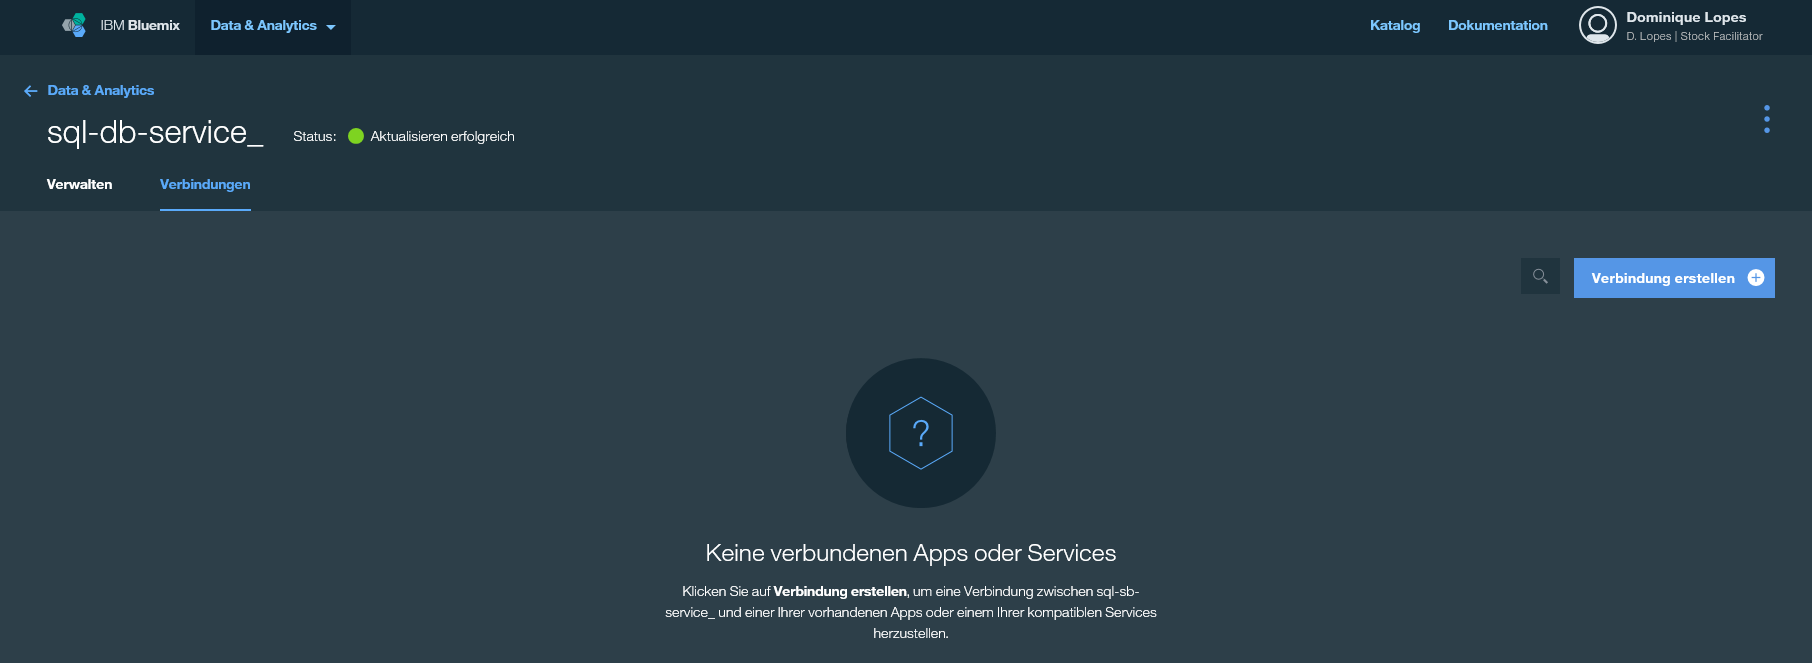
You will see that (currently) there is no conncetion to any application. This is something we want to change: we click create connection and add the StockFacilitator application. It takes a little while and the overview is updated with the new conncetion between the sql-db-service and the stock faciliator application.

With this last step, we're done in the Bluemix environment.
Explore database service provided by Bluemix (optional)
In this section we will take a closer look at the database service we have just created in our Bluemix account.
So, let's navigate to the ElephantSQL service (if you are not there yet) and open the ElephantSQL Dashboard from the service' overview page in IBM Bluemix. The ElephantSQL console should open in a new window:
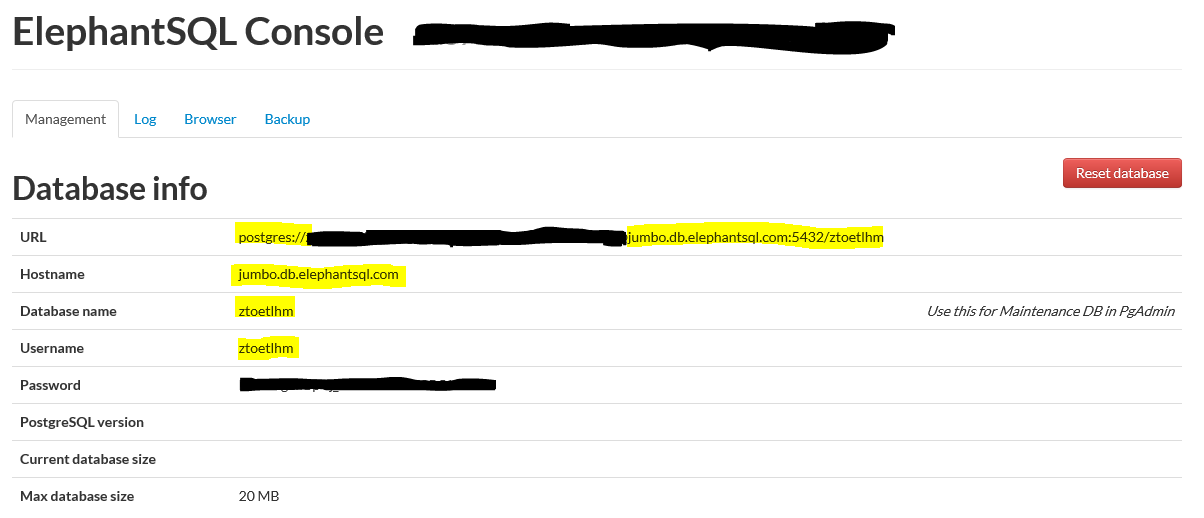
On the "Management" tab you can find all relevant database connection parameters, that are necessary to connect from a remote application (e. g. from a PgAdmin instance running on your computer). The other tabs "Logs", "Browse" and "Backup" are of no further interest for us right know because we haven't stored anything in the database yet.
For now we want to connect to the database only from the database perspective in the eclipse based Spring Tool Suite (STS). As a first step we need to download the Postgres JDBC driver. This can be done here: https://jdbc.postgresql.org/download.html
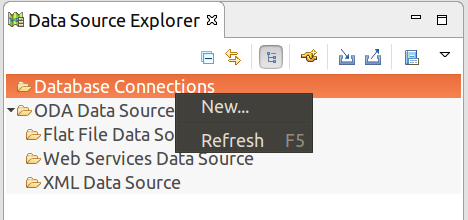
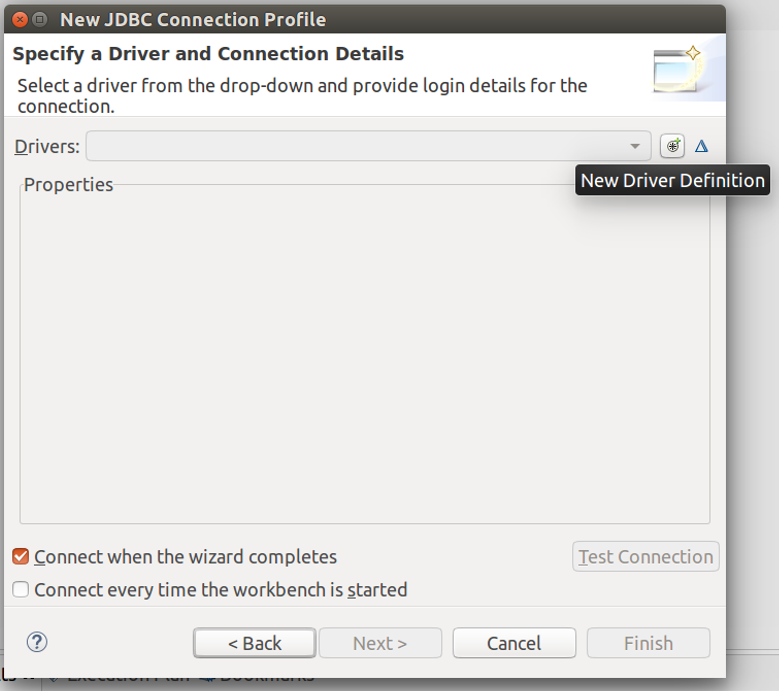
In STS, create a new database connection (from database development perspective).
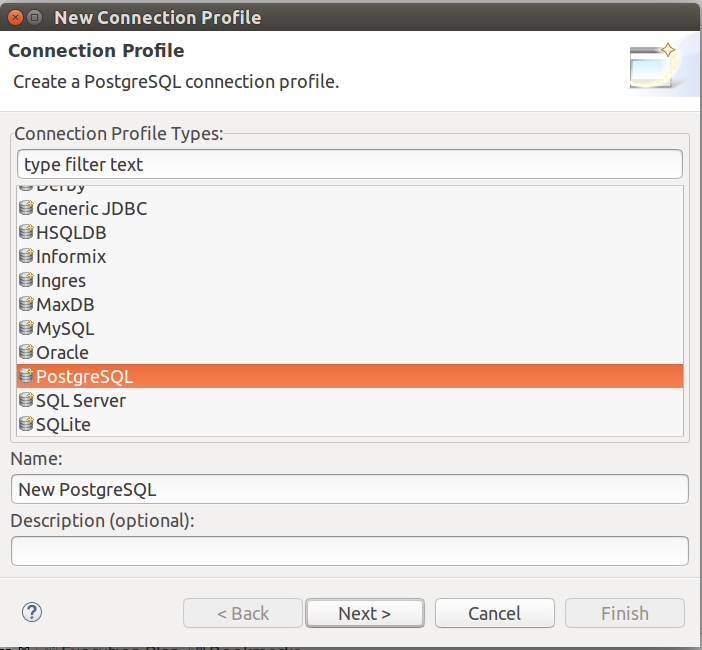
Choose PostgreSQL as profile type, provide a proper name and click next.
If you don't have a created a driver definition for PostgreSQL before, then click the small "New Driver Definition" button next to the Drivers dropdown:
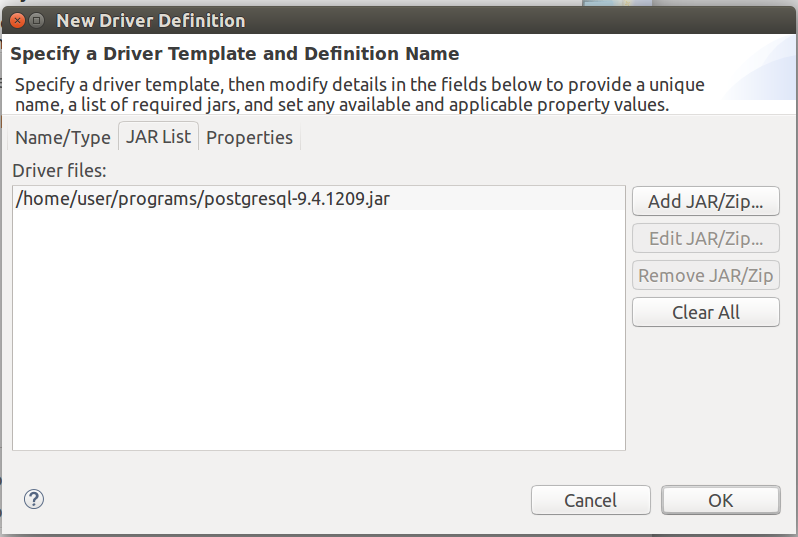
In the "New Driver Definition" popup you will encounter an error message saying "unable to locate JAR/zip in file system as specified by the driver definition: ..." . Goto the "Jar List" tab and supply the driver we have downloaded in the first step to fix this.
Move on to the tab "properties" and enter the database connection parameters we have gathered at the beginning of this section in the ElephantSQL console and click OK:

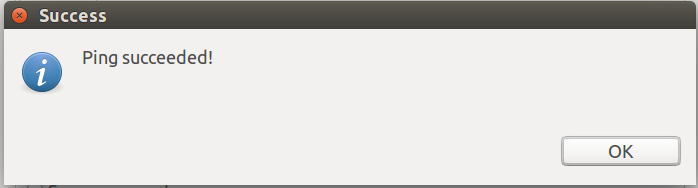
Back in the "New JDBC Connection Profile" Wizard you can test your connection now. Click on the button "Ping" and when everything went right you should see the following popup:
After a final confirmation, the JDBC Connection Profile (pointing to our database service in the cloud) is now created and can be "clicked through" in the data source explorer.
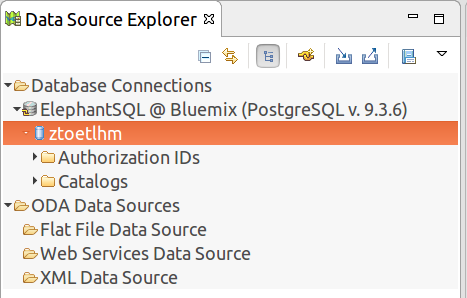
Here can explore the content of the database. We havn't created anything in our database yet but there are already some standard tables, functions, datatypes, etc. We will come back to this later in order to check what our application has populated in the database. For we are done with exploring the database and can focus on our application again.
Provide database service within the application
At first we want to provide the correct JDBC driver for the database in our cloud environment. In order to do so we adjust the setting for our profile "war" in the pom.xml:
- the scope of the HSQL driver (that we need in the local environment) to is set to "provided"
- the PostgreSQL driver is add
<profiles>
		<profile>
			<id>war</id>
			<properties>
				<packaging.type>war</packaging.type>
			</properties>
			<dependencies>
				<dependency>
					<groupId>org.springframework.boot</groupId>
					<artifactId>spring-boot-starter-tomcat</artifactId>
					<scope>provided</scope>
				</dependency>
				<dependency>
					<groupId>com.h2database</groupId>
					<artifactId>h2</artifactId>
					<scope>provided</scope>
				</dependency>
				<dependency>
				    <groupId>org.postgresql</groupId>
				    <artifactId>postgresql</artifactId>
				</dependency>
			</dependencies>
			<build>
				<plugins>
					<plugin>
						<groupId>org.springframework.boot</groupId>
						<artifactId>spring-boot-maven-plugin</artifactId>
					</plugin>
					<!-- skipping test for war packaging in order to avoid memory issues -->
					<plugin>
				        <groupId>org.apache.maven.plugins</groupId>
				        <artifactId>maven-surefire-plugin</artifactId>
				        <configuration>
				          <skipTests>true</skipTests>
				        </configuration>
				    </plugin>
					<plugin>
						<artifactId>maven-clean-plugin</artifactId>
						<version>2.5</version>
						<executions>
							<execution>
								<id>auto-clean</id>
								<phase>initialize</phase>
								<goals>
									<goal>clean</goal>
								</goals>
							</execution>
						</executions>
					</plugin>
				</plugins>
			</build>
		</profile>
	</profiles>
This will exchange to HSQL driver with the PostrgeSQL driver. Honestly, I find it a little strange that we have to do so because I would have imagined that IBM Bluemix is automatically providing the driver itself once the corresponding database service is bound to the application but obviously this is not the case (if you omit this step you will inevitably receive a some kind of Exception because the appropriate database driver was not be loaded).
As a next step, we need to make the application aware of the database service. That's why we will create an application manifest - so far we did not need that, but now we have to tell the application and the cloud environment that there is a database service to use. directly in the root of the appliaction create a file named manifest.yml with the following content:
applications:
  - name: stock-facilitator
    services:
        - sql-db-service
    env:
      SPRING_PROFILES_DEFAULT: cloud
The following two things are noteworthy in this file:
- In line 4 we declare the sql-db-service we have created in the first part of this block. The names have to match exactly as this is the way we bind the service to the application.
- in line 6 we specify the spring default profile as "cloud" which is be important for our next step.
Finally we have to make the database service available as a bean. This can be done by means of an implementation of the AbtractCloundConfig class and some additional annotations:
package de.dlopes.stocks.facilitator.config;

import org.springframework.cloud.app.ApplicationInstanceInfo;
import org.springframework.cloud.config.java.AbstractCloudConfig;
import org.springframework.cloud.config.java.ServiceScan;
import org.springframework.context.annotation.Bean;
import org.springframework.context.annotation.Configuration;
import org.springframework.context.annotation.Profile;

@Configuration
@Profile("cloud")
@ServiceScan
class CloudConfig extends AbstractCloudConfig {

	@Bean
	public ApplicationInstanceInfo getApplicationInfo() {
		return cloud().getApplicationInstanceInfo();
	}

}
In line 11 we set @Profile("cloud") to ensure that this configuration is loaded only in a cloud environment (that's why we have just specified the spring default profile "cloud" in the step before). The @ServiceScan annotation scans for all bound services and creates a bean for each of these services - similar to what the @ComponentScan does with candiates for beans. The beans created by the @ServiceScan annotation are then autowired based on their bean type to other components of the application. As we currently have bound only one database service to our appliaction the @ServiceScan annotation will create a corresponding javax.sql.Datasource bean. We also create a bean corresponding application instance information in case we want to evaluate this information later on.
So actually one would expect that our changes are enough to exchange the in-memory database with a datasource provided from the cloud enviroment as the persistence layer. However, these changes in combination with Spring Security do not work in every case: the start up of our application in IBM bluemix will fail with a bunch of exceptions having a org.springframework.jdbc.datasource.init.ScriptStatementFailedException as root cause.
I was very surprised to find out what the reason for this was: due to our current implementation of our SecurityConfig class we try to run our JDBC authentication against the cloud datasource with a default schema:
        @Autowired
	public void configureGlobal(AuthenticationManagerBuilder auth) throws Exception {
		auth.jdbcAuthentication()
			.dataSource(dataSource) // points this config to datasource provided by Spring
			.withDefaultSchema()	// returns Jdbc-based userDetailsService
			.withUser(config.getDefaultUser()) // set username
			.password(config.getDefaultPassword()) // set password
			.roles(config.getDefaultRole()); // assign user role
	}
During the first start-up of the application the database tables for users and roles are missing so that spring security automatically tries to create them. Apparently, the SQL script (containing the DDL to create the tables and indices) is specific to MySQL databases and does not fit for a PostgreSQL database (http://stackoverflow.com/questions/24174884/spring-security-jdbcauthentication-default-scheme-error-on-postgresql). This is the script provided by Spring Security (you can look it up yourself underneath https://github.com/spring-projects/spring-security-javaconfig/blob/master/spring-security-javaconfig/src/main/resources/org/springframework/security/core/userdetails/jdbc/users.ddl):
create table users(username varchar_ignorecase(50) not null primary key,password varchar_ignorecase(500) not null,enabled boolean not null);
create table authorities (username varchar_ignorecase(50) not null,authority varchar_ignorecase(50) not null,constraint fk_authorities_users foreign key(username) references users(username));
create unique index ix_auth_username on authorities (username,authority);
According to the PostgreSQL documentation the data type "varchar_ignorecase" (but which is used by the script) does not exist: https://www.postgresql.org/docs/9.3/static/datatype.html#DATATYPE-TABLE
The only possibility to stick with a PostgreSQL database - without manually creating the needed tables - is to create a custom UserDetailsService that leverages the JPA and Hibernate capabilities that we have already added to our application in the last session.
Create JPA based entites User and Role
As we can't use the SQL script provided by Spring Security, we will build our own JPA based entities User and UserRole. The following figure illustrates to desired data model:
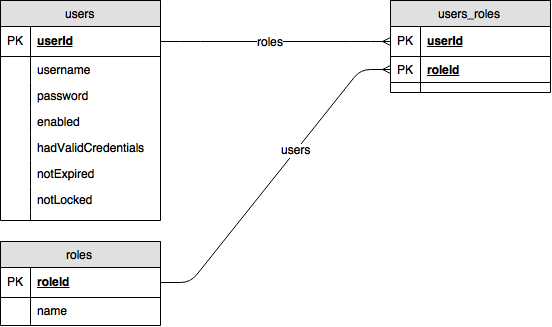
This data model enables us to store and manage users and roles and and to join them by a many-to-many relationship table. Using Lombok and JPA related annotations we can implement the visual data model from above just with the two following classes (we put them to the rest of our JPA related implementations into the package de.dlopes.stocks.facilitator.data):
User.java:
package de.dlopes.stocks.facilitator.data;

import java.util.List;

import javax.persistence.Column;
import javax.persistence.Entity;
import javax.persistence.GeneratedValue;
import javax.persistence.Id;
import javax.persistence.JoinTable;
import javax.persistence.ManyToMany;
import javax.persistence.Table;
import javax.validation.constraints.NotNull;

import lombok.Data;

@Data
@Entity
@Table(name="users")
public class User {

	@Id
	@GeneratedValue
	private Long userId;

	@Column(unique=true)
	private String username;

	@NotNull
	private String password;

	private boolean enabled;
	private boolean hasValidCredentials;
	private boolean notExpired;
	private boolean notLocked;

	@ManyToMany
	@JoinTable(name = "users_roles")
	private List<UserRole> roles;

/* constructors for simpler management of many-to-many relationships */

	public User() {

	}

	public User(String name, String password, List<UserRole> roles){
        this.username = name;
        this.password = password;
        this.enabled = true;
    	this.hasValidCredentials = true;
    	this.notExpired = true;
    	this.notLocked = true;
        this.roles = roles;
    }

}
It is recommended to overload the a constructor with an implementation that sets all fields of this entity because the many-to-many relationship for the field roles will otherwise make the instantiation of this class much harder and less readable. This because in the many-to-many scenario we have to maintain the relationship on an object-relational level from both sides: The JPA does not automatically update the field of the referenced entity with the referencing entity - in our example: the property users of the UserRole entities with the referencing User entities.
UserRole.java:
package de.dlopes.stocks.facilitator.data;

import java.util.List;

import javax.persistence.Column;
import javax.persistence.Entity;
import javax.persistence.GeneratedValue;
import javax.persistence.Id;
import javax.persistence.ManyToMany;
import javax.persistence.Table;

import lombok.Data;

@Data
@Entity
@Table(name="roles")
public class UserRole {

	@Id
	@GeneratedValue
	private Long roleId;

	@Column(unique=true)
	private String name;

	@ManyToMany(mappedBy = "roles")
	private List<User> users;

/* constructors for simpler management of many-to-many relationships */

	public UserRole() {

	}

	public UserRole(String name) {
		this.name = name;
	}

}
Create User and Roles Repository classes
In order to be able to easily store and access our User and UserRole entities, we have to create one spring data JPA Repository interfaces for each entity (like we did already for the StockInfo entities in our last session). We place both repository interfaces again underneath de.dlopes.stocks.facilitator.data.
UserRepository.java:
package de.dlopes.stocks.facilitator.data;

import org.springframework.data.jpa.repository.JpaRepository;

public interface UserRepository extends JpaRepository<User, Long> {

	// CRUD operations inherited from parent interface

	public User findByUsername(String username);

}
UserRoleRepository.java:
package de.dlopes.stocks.facilitator.data;

import org.springframework.data.jpa.repository.JpaRepository;

public interface UserRoleRepository extends JpaRepository<UserRole, Long> {

	// CRUD operations inherited from parent interface

	public UserRole findByName(String name);
}
As in our last session, there is no implementation of these interface needed. All necessary logic to access the data is inferred from the backing data model classes (JPA entity classes). We have introduced the methods findByUsername (in the UserRepository interface) and findByName (in the UserRoleRepository interface). Also here, no concrete implementation is needed. The SQL queries to exectue are automatically derived by naming conventions: as long as the method name starts with findBy and is concatenated with an attribute name of the underlying JPA entity class this is automatically translated into a SELECT statement with a WHERE clause based on the given attribute.
Create and use custom UserDetailsService
As one of our last steps we will create a custom UserDetailsService based our user and user role data model classes. We create the this custom UserDetailsService in the package de.dlopes.stocks.facilitator.security:
package de.dlopes.stocks.facilitator.security;

import java.util.ArrayList;
import java.util.HashSet;
import java.util.List;

import javax.transaction.Transactional;

import org.springframework.beans.factory.InitializingBean;
import org.springframework.beans.factory.annotation.Autowired;
import org.springframework.security.core.GrantedAuthority;
import org.springframework.security.core.authority.SimpleGrantedAuthority;
import org.springframework.security.core.userdetails.UserDetails;
import org.springframework.security.core.userdetails.UserDetailsService;
import org.springframework.security.core.userdetails.UsernameNotFoundException;
import org.springframework.stereotype.Service;

import de.dlopes.stocks.facilitator.config.ConfigurationSettings;
import de.dlopes.stocks.facilitator.data.User;
import de.dlopes.stocks.facilitator.data.UserRepository;
import de.dlopes.stocks.facilitator.data.UserRole;
import de.dlopes.stocks.facilitator.data.UserRoleRepository;

@Service
public class MyUserDetailsService implements UserDetailsService, InitializingBean {

	@Autowired
	private ConfigurationSettings config;

	@Autowired
	UserRepository userRepo;

	@Autowired
	UserRoleRepository userRoleRepo;

	@Transactional // important: otherwise we can't store the many-to-many rel.
	@Override	   // between user and userRole
	public UserDetails loadUserByUsername(String username) throws UsernameNotFoundException {

		User user = userRepo.findByUsername(username);

		if (user == null) {
			throw new UsernameNotFoundException(username + " does not exist");
		} else if (user.getRoles().isEmpty()) {
			throw new UsernameNotFoundException("User" + username + " has no authorities");
		}

		return buildUserDetails(user);
	}

	// populate the default user in the database
	// (otherwise we wouldn't be able to ever login)
	@Override
	@SuppressWarnings("serial")
	public void afterPropertiesSet() throws Exception {

		// get default settings from configuration
		String username = config.getDefaultUser();
		String password = config.getDefaultPassword();
		String role = config.getDefaultRole();

		// check if default user and role exist
		UserRole userRole = userRoleRepo.findByName(role);
		User user = userRepo.findByUsername(username);

		// create default user and role if both does not exist in the DB yet
		if (user == null && userRole == null) {

			userRole = new UserRole(role);
			userRoleRepo.save(userRole);
			final UserRole tmpRole = userRoleRepo.findByName(role);

			userRepo.save(new HashSet<User>(){{
				add(new User(username, password, new ArrayList<UserRole>(){{
					add(tmpRole);
				}}));
			}});

		}

	}

	private org.springframework.security.core.userdetails.User buildUserDetails(User user) {
		List<GrantedAuthority> auth = buildUserAuthority(user.getRoles());

		org.springframework.security.core.userdetails.User res =
			new org.springframework.security.core.userdetails.User(
				user.getUsername(),
				user.getPassword(),
				user.isEnabled(),
				true,
				true,
				true,
				auth
			);

		return res;
	}

	private List<GrantedAuthority> buildUserAuthority(List<UserRole> userRoles) {

		List<GrantedAuthority> res = new ArrayList<GrantedAuthority>();
		for (UserRole userRole : userRoles) {
			// prefix 'ROLE_' is required and this has to be added for the granted authority
			res.add(new SimpleGrantedAuthority("ROLE_" + userRole.getName()));
		}

		return res;
	}

}
In this class we do a couple of things which need to get a little more granular on in following:
- first of all we have autowired our repository interfaces to this class so that the Spring Framework will inject the concrete impelementations and gives us access to the database operations these classes offer (see lines 30 - 34)
- below that we have implemented the loadUserByUsername method which basically represents the login mechanism and is needed by Spring Security's UserDetailsService interface (see lines 36 - 49). Of course, it uses the autowired repository interfaces to do so. Noteworthy:
- We have used the JPA annotation @Transactional (see line 36) to avoid a LazyInitializationException which would be thrown because of the access to the roles attribute of the User entity in line 84 (this is executed due to a subsequent call of the method buildUserDetails within the loadUserByUsername method).
- The reason why this exception would be thrown is simple: the roles attribute of the User entity is declared as a Many-To-Many relationship between the User entiy and the UserRole entity. Many-To-Many relationships are usually lazy loaded and thus would only be requested from the database after the User entity was loaded by means of the UserRepository interface. But at that time the database session is already closed. Annotating the loadUserByUsername method with @Transactional solves the problem because it keeps the database session open for the runtime of the annotated method and thus on access on the roles attribute at the User entity the data can be lazy loaded.
- there are multiple ways to solve this issue (see http://stackoverflow.com/questions/15359306/how-to-load-lazy-fetched-items-from-hibernate-jpa-in-my-controller for futher details). For now we have implemented the simplest way of a fix. It might be that we solve this issue with a more elaborate solution in the future.
- In order to populate the database with some default user settings we implement the InitializingBean interface. This gives us the possibility to put the relevant coding into the method afterPropertiesSet (see lines 55 - 81). The default user settings are loaded by means of the autowired ConfigurationSettings (see line 28).
Finally, we have to make use of our new custom UserDetailsService. That's why we adjust our existing SecurityConfig class once more:
	@Autowired
	public void configureGlobal(AuthenticationManagerBuilder auth) throws Exception {
		// use the userDetailsService for login
		auth.userDetailsService(myUserDetailsService);
	}
We set the userDetailsService attribute of the AuthenticationManagerBuilder in the method configureGlobal to our own custom UserDetailsService implementation. Again, we obtain a reference to that implementation by means of the autowiring functionalities of the Spring Framework.
Enable automatic database initialization via JPA and Hibernate
We have done a lot to make our application independent of a specific database vendor. As a last step, we tell hibernate to automatically create the database tables through Spring JPA. This is done by adding the following line to our application.properties in the /source/main/resources folder of our application:
spring.jpa.hibernate.ddl-auto=updateTest locally and in the cloud environment
The application can now run locally and in the cloud. Try it out. You can follow the instructions of the last session for a local test. For the test in the cloud you need to deploy the application first. We use the bash script push2bluemix.sh for a simple deployment of the current implementation:
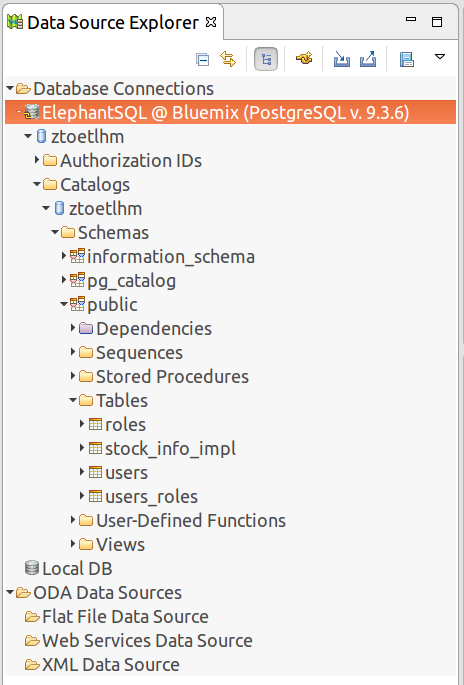
It will take a while until your application has been successfully deployed to IBM Bluemix. Afterwards you can open up the application in the cloud and navigate through it just like you did on your the local computer. Actually from a users perspective there is no change of the application. To find our if everything worked fine (and e. g. no in-memory database is used anymore) you can open up the database perspective in Spring ToolSuite again. Here you should see now that the database tables have been populated automatically in the PostgreSQL database related to your cloud service:
Recap
Today, we've put quite some effort into running our application with a database service in the cloud. The many challenge was to integrate the PostgreSQL specific database service in the cloud environment with the Spring Security module of our application. We came across some stumbling blocks which needed a more complex implementation than expected. Finally, we could solve these issues by introducing a custom UserDetailsService implemenation based on JPA.
Our current high-level component based view of the application has now been complemented by the usage of our fist cloud service:

In the next session we will focus on choosing the right opensource license and do some documentation.
This tutorial was inspired by the following sources:
- http://cloud.spring.io/spring-cloud-connectors/
- https://spring.io/blog/2014/06/03/introducing-spring-cloud
- http://docs.spring.io/spring-data/jpa/docs/1.11.0.M1/reference/html/#repositories.query-methods
- https://dzone.com/articles/jpa-lazy-loading
- https://docs.spring.io/spring-boot/docs/current/reference/html/howto-database-initialization.html
About me

Dominique Lopes is a Senior SAP Consultant at MHP with more than 10 years experience in Software Development in various programming languages. In his leisure time he enjoys to try out new IT trends in his private software projects.
Syndication
