Projects
Adding security
Written by Dominique LopesIn our last session we have added some real life coding to our Spring Boot based cloud application.
Today, we want to …
- define pulic and secured areas of our application,
- introduce a basic role-based security,
- implement a login and logout mechanism and
- use an in-memory database for user queries.
Of course, we will run the application in our local environment and in the cloud.
A current high-level component based view of that application looked like this:
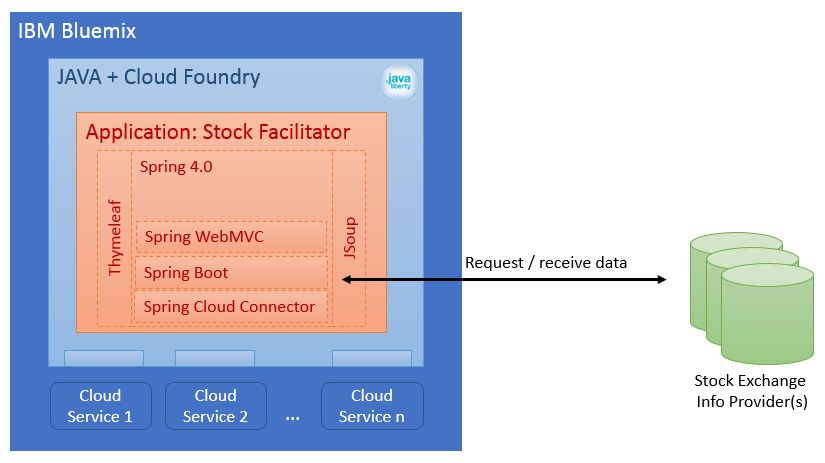
Now, we want to introduce some basic security aspescts in our application. It's not that we need to hide something but we will need user accounts in the future. So, we will introduce the basic security concepts as early as possible.
Define secured and public application areas
Obviously, we need a public and a secured area in our application. As a first step, we need a clear view on the desired application flow.
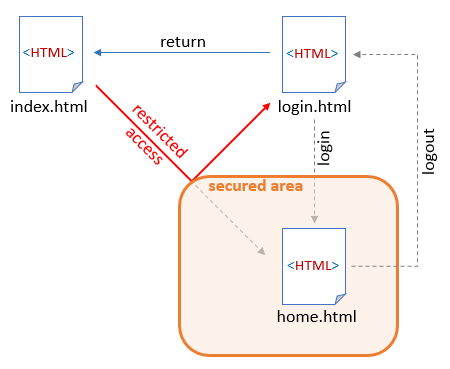
This is what we want to achieve in today's session:
- We want to have a public index and login page which are linked with each other.
- On access to the Homepage the user is automatically redirected to the login page, because the Homepage resides in the secured area of the application.
- From the Homepage it shall be possible to logout again.
Implement role-based security
We are going to use Spring Security to secure our application because it integrates nicely with the software libraries we have already in place. Spring Security is a framework that focuses on providing both authentication and authorization to Java applications and features comprehensive and extensible support for as well as protection against attacks like session fixation, clickjacking, cross site request forgery, etc.
At first, we have to add Spring Security as a dependency to the Maven pom.xml:
<!-- Spring Security -->
<dependencies>
    <dependency>
        <groupId>org.springframework.security</groupId>
        <artifactId>spring-security-web</artifactId>
        <version>4.1.1.RELEASE</version>
    </dependency>
	<dependency>
		<groupId>org.springframework.security</groupId>
		<artifactId>spring-security-config</artifactId>
		<version>4.1.1.RELEASE</version>
	</dependency>
	<dependency>
		<groupId>org.thymeleaf.extras</groupId>
		<artifactId>thymeleaf-extras-springsecurity4</artifactId>
		<version>2.1.2.RELEASE</version>
	</dependency>
</dependencies>
Remember: currently, we are using Thymeleaf as our view template engine. Luckily, the integration between Thymeleaf and Spring Security is supported with an additional module. That's why we have added the Thymeleaf SpringSecurity Extra dependency (see lines 93 - 97).
Now we can add our SecurityConfig class which controls the freely accessable as well as the restricted areas in the application:
package de.dlopes.stocks.facilitator.security;

import org.springframework.beans.factory.annotation.Autowired;
import org.springframework.security.config.annotation.authentication.builders.AuthenticationManagerBuilder;
import org.springframework.security.config.annotation.web.builders.HttpSecurity;
import org.springframework.security.config.annotation.web.configuration.EnableWebSecurity;
import org.springframework.security.config.annotation.web.configuration.WebSecurityConfigurerAdapter;

@EnableWebSecurity
public class SecurityConfig extends WebSecurityConfigurerAdapter {

	@Override
	protected void configure(HttpSecurity http) throws Exception {
		http.authorizeRequests()
				// allow access to styles, images and the index page
				.antMatchers("/css/**", "/img/**", "/index.html").permitAll()
				// restrict secured area to users
				.antMatchers("/secured/**").hasRole("USER")
				.and()
			.formLogin()
				.loginPage("/login").failureUrl("/login-error");
	}

	@Autowired
	public void configureGlobal(AuthenticationManagerBuilder auth) throws Exception {
		auth.inMemoryAuthentication()
				// add intial user credentials Username: user and Password: password
				.withUser("user").password("password").roles("USER");
	}
}
With this we basically ...
- declared CSS stylesheets, images and the index page as freely accessable resources
- defined the context path /secured/** as secured resource which can be accessed only by authorized users with the role "USER"
- defined the user to a login form respectively error page (both will be specified next).
- setup an intial user with the credentials username "user" and password "password" as well as the role "USER"
With this the application is already secured but we are missing still a few bits of the final solution.
Restructure the application
As our application from last session is not very complex and does not yet reflect secured and public areas we need to rename and move around the existing classes and templates a little bit.
At first, we will slightly adjust our existing HomeController:
package de.dlopes.stocks.facilitator.controller;

import org.springframework.beans.factory.annotation.Autowired;
import org.springframework.stereotype.Controller;
import org.springframework.ui.Model;
import org.springframework.web.bind.annotation.RequestMapping;

import de.dlopes.stocks.facilitator.config.ConfigurationSettings;
import de.dlopes.stocks.facilitator.services.StockDataCollector;

@Controller
public class HomeController {

	@Autowired
	ConfigurationSettings cs;

	@RequestMapping("/secured/home")
        public String home(Model model) {
		StockDataCollector dataCollector = cs.getDataCollector();
		model.addAttribute("stocks", dataCollector.getData());
		return "home";

        }

}
In order to make the HomeController only available for requests within the secured area, we just have to alter the @RequestMapping annotations context path parameter from "/" to "/secured/home" (see line 17). In future developments, we will add more and more template files. So we have to come up with a simply and transparent strategy to name and use them. An easy way to do that, is to match the name of the template with the name of controller and method using it. That's why we change the method name and the return parameter of the only method of the HomeController to "home" (see lines 18 and 21).
As we don't like to mix things of the secured HomeController with other aspects of the freely accessable area of our application, we create another controller class - our PublicController:
package de.dlopes.stocks.facilitator.controller;

import org.springframework.stereotype.Controller;
import org.springframework.ui.Model;
import org.springframework.web.bind.annotation.RequestMapping;

@Controller
public class PublicController {

	@RequestMapping("/")
	public String root() {
		return "redirect:index";
	}

	@RequestMapping("/index")
	public String index() {
		return "index";
	}

	@RequestMapping("/login")
	public String login() {
		return "login";
	}

	@RequestMapping("/login-error")
	public String loginError(Model model) {
		model.addAttribute("loginError", true);
		return "login";
	}

}
Within this PublicController class we define 4 methods with corresponding request mappings - one each for the needed context paths:
| Context-Path | Explanation |
| "/" | the application root: this method simply redirects us to the context path "/index" (see next bullet Point) |
| "/index" | the default page: this method just returns the template name "index" for rendering by Thymeleaf template engine |
| "/login" | the login page: this method just returns the template name "login" for rendering by Thymeleaf template engine |
| "/login-error" | the error page: this method is invoked when an error occurs during the login. Thus is adds the info that a login error has happend to the model and returns the template name "login" again for rendering by Thymeleaf template engine |
We could have included these request mappings also in our HomeController but I like the idea of separation of concerns which is why we have "out-sourced" the public aspects into another controller.
Now we are done with the coding part and we can turn towards the HTML related adjustments. When we adjusted the request mapping for the HomeController we also changed the template name from "index" to "home". That's why we have to rename the existing index.html underneath /src/main/resources/templates to home.html before we can make further adjustments.
Adjust and add Thymeleaf templates
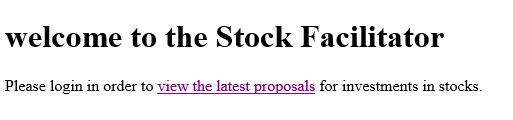
As we have renamed the index Page to home.html we need a new one. So, we create the proper index.html (that will just welcome the user and point to the secured area) underneath the template directory /src/main/resources/templates:
<!DOCTYPE HTML>
<html xmlns:th="http://www.thymeleaf.org">
	<head>
		<title>Stock Facilitator: Start</title>
		<meta http-equiv="Content-Type" content="text/html; charset=UTF-8" />
	</head>
	<body>

	  <h1>welcome to the Stock Facilitator</h1>

	  Please login in order to <a href="/secured/home" th:href="@{/secured/home}">view the latest proposals</a> for investments in stocks.

	</body>
</html>
Hint: We could have stored this file also underneath /src/main/resources/static but if we did that, we would not be able to use Thymeleaf later on to put some dynamic stuff on this page. So, to be prepared for future requirements, we already put it in the right place.
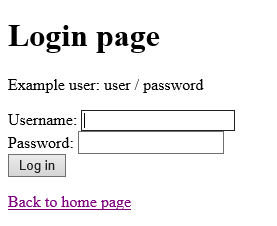
Our next step is to assemble the HTML code for our login page, which resides in the template directory /src/main/resources/templates as well:
<!DOCTYPE html>
<html xmlns="http://www.w3.org/1999/xhtml" xmlns:th="http://www.thymeleaf.org">
<head>
<title>Stock Facilitator: Login</title>
<meta charset="utf-8" />
<link rel="stylesheet" href="/css/main.css" th:href="@{/css/main.css}" />
</head>
<body>
<h1>Login page</h1>
<p>Example user: user / password</p>
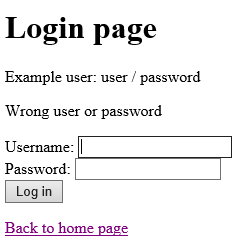
<p th:if="${loginError}" class="error">Wrong user or password</p>
<form th:action="@{/login}" method="post">
<label for="username">Username</label>:
<input type="text" id="username" name="username" autofocus="autofocus" /> <br />
<label for="password">Password</label>:
<input type="password" id="password" name="password" /> <br />
<input type="submit" value="Log in" />
</form>
<p><a href="/index" th:href="@{/index}">Back to home page</a></p>
</body>
</html>It is interesting, that the login page doesn't contain anything specific for spring security:
- the model attribute "login error" is evaluated to show an error message, if appropriate (see line 11)
- the login form points to context path "/login" (see line 12) - the same we have defined as login page in our SecurityConfiguration class (see section Implement role-based security)
That's it. Impressive, how much complexity is hidden from us by means of the Thymeleaf template engine and it's extension for Spring Security.
Finally, we have to adjust our home.html once more. As it is our only secured page right now, we need to add a logout button to this page. The following fragement will do so:
	<div class="logout" style="float:right" th:fragment="logout" sec:authorize="isAuthenticated()">
		Logged in user: <span sec:authentication="name"></span>
		(<span sec:authentication="principal.authorities"></span>)
		<div>
			<form action="#" th:action="@{/logout}" method="post">
				<input type="submit" value="Logout" />
			</form>
		</div>
	</div>
You might have noticed the usage of the security-related namespace "sec" in lines 10 - 12. This namespace is not declared yet. Hence, we have to add the "sec" namespace and map it to the corresponding URL in the html Tag at the root of the page:
<!DOCTYPE HTML>
<html xmlns:th="http://www.thymeleaf.org"
	  xmlns:sec="http://www.thymeleaf.org/thymeleaf-extras-springsecurity4">

<!-- further html code ... -->
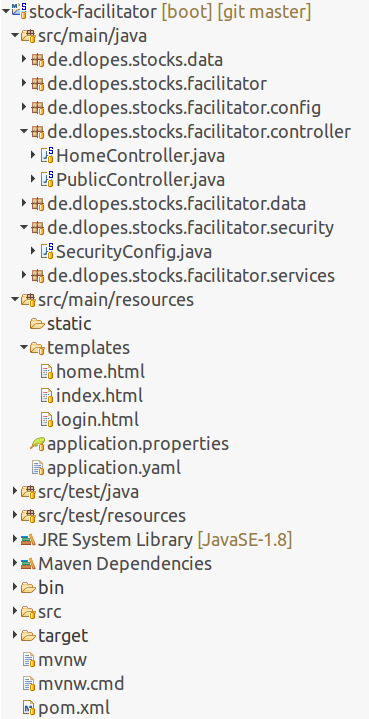
In the repository browser, our application should look like this now:
Some optimizations
At the moment our application is not very flexible in terms of authentication yet. For a start, we can improve this by making user credentials configurable.
At first, we need to add the user credentials as parameters to our application.yaml:
config:
  url: http://www.finanzen.net/aktien/DAX-Realtimekurse
  defaultUser: user
  defaultPassword: password
  defaultRole: USER
In our next step, we create the corresponding properties in our configuration class ConfigurationSettings:
package de.dlopes.stocks.facilitator.config;

import org.springframework.boot.context.properties.ConfigurationProperties;
import org.springframework.context.annotation.Bean;
import org.springframework.stereotype.Component;

import de.dlopes.stocks.facilitator.services.HTMLFileExtractor;
import de.dlopes.stocks.facilitator.services.StockDataCollector;
import lombok.Data;

@Data
@Component
@ConfigurationProperties(prefix="config")
public class ConfigurationSettings {

	// member varialbles are automatically bound to application.yaml config due to
	// @ConfigurationProperties annotation of the class
	private String url;
	private String defaultUser;
	private String defaultPassword;
	private String defaultRole;

	@Bean
	public StockDataCollector getDataCollector() {
		return new HTMLFileExtractor(url);
	}

}
Finally, we adjust our SecurityConfig class once more to take the configurated user credentials into account:
@EnableWebSecurity
public class SecurityConfig extends WebSecurityConfigurerAdapter {

	@Autowired
	private ConfigurationSettings config;

	@Override
	protected void configure(HttpSecurity http) throws Exception {
		http.authorizeRequests()
				// allow access to styles, images and the index page to everybody
				.antMatchers("/css/**", "/img/**", "/index.html").permitAll()
				// restrict secured area to users with a certain role
				.antMatchers("/secured/**").hasRole(config.getDefaultRole())
				.and()
			.formLogin()
				// set login and logout page
				.loginPage("/login").failureUrl("/login-error");
	}

	@Autowired
	public void configureGlobal(AuthenticationManagerBuilder auth) throws Exception {
		auth.inMemoryDatabase()
			.withUser(config.getDefaultUser()) // set username
			.password(config.getDefaultPassword()) // set password
			.roles(config.getDefaultRole()); // assign user role
	}

}
The configuration settings are automatically injected by the Spring Framework (see line 16). Furthermore, we have replaced the static string literals for the user credentials with the configuration parameters read via our ConfigurationSettings class. With these adjustments we dont need to know the organisation of our application anymore. All we have to remember is the application.yaml containing the default user credentials.
Persistence powered by in-memory database
Before we call it a day, we want to prepare our application to cope with future requirements regarding persistence already. That is why we will introduce loading and storing of our stock information from/into an in-memory database.
We will change our application logic so that the following activity diagram is reflected:
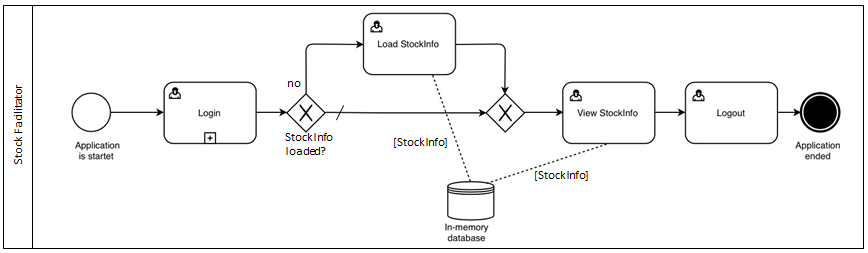
So, we will store the stock information in our database and load it from there when it is displayed to the user. On initial start-up of the application the data will not be in the database. That's why we also enable the user to load the stock information into our database, if necessary.
A usual approach to implement in-memory database persistence is by means of an H2 database and the usage of JDBC and JPA as a low-level abstraction layers. Among the various Spring.io projects there are already two components we can make use of in our application:
- Spring Data: a general persistence framework for data repositories (comletely independent from the underlying storage). This will serve as our high-level abstraction layer so that we don't have to deal to much with all the JPA stuff
- Spring Data JPA: the glue between Spring Data and JPA
At first we need to add the dependencies mentioned above to our Maven pom.xml:
                <!-- in memory database for local tests + JPA -->
		<dependency>
			<groupId>com.h2database</groupId>
			<artifactId>h2</artifactId>
		</dependency>
		<dependency>
			<groupId>org.springframework.boot</groupId>
			<artifactId>spring-boot-starter-data-jpa</artifactId>
		</dependency>
Besides Spring Data JPA we have to add the h2 database dependecy as well because we need the correct JDBC driver to access the database.
From now on, we are able to use the JPA annotations in our data model class(es). This is something we will immmediately apply to the StockInfoImpl class:
package de.dlopes.stocks.facilitator.data;

import java.time.LocalTime;

import javax.persistence.Entity;
import javax.persistence.GeneratedValue;
import javax.persistence.Id;

import de.dlopes.stocks.data.StockInfo;
import lombok.Data;

@Data
@Entity
public class StockInfoImpl implements StockInfo {

	@Id
	@GeneratedValue
	private Long id;

	private String index;
	private String WKN;
	private String ISIN;
	private String name;
	private Double price;
	private Double bid;
	private Double ask;
	private Double changePercentage;
	private Double changeAbsolute;
	private LocalTime time;

}
Actually, not much has changed in this class:
- We declared it to a relevant class for JPA with the @Entity annotation (see line 13)
- We extended it with a primary key which is automatically generated and stored in the property ID (see lines 16 - 18)
- Additionaly, we moved the class from de.dlopes.stocks.data to the package de.dlopes.stocks.facilitator.data because it was outside the scope of Spring Frameworks component scan before
With that we have defined the schema of our database but we havent implemented the access to the StockInfoImpl instances (in the database) yet. So, we create a CRUD repository interface to access the database in our next step:
package de.dlopes.stocks.facilitator.data;

import org.springframework.data.jpa.repository.JpaRepository;

public interface StockInfoRepository extends JpaRepository<StockInfoImpl, Long> {

	// CRUD operations inherited from parent interface

}
I find it quite interesting that literally no implementation of that interface is needed. All necessary logic to access the data seems to be inferred from the backing data model class StockInfoImpl.
We will see in the next step that we can directly use the interface in our HomeController class without any further ado:
package de.dlopes.stocks.facilitator.controller;

import java.util.List;

import org.springframework.beans.factory.annotation.Autowired;
import org.springframework.stereotype.Controller;
import org.springframework.ui.Model;
import org.springframework.web.bind.annotation.RequestMapping;

import de.dlopes.stocks.data.StockInfo;
import de.dlopes.stocks.facilitator.config.ConfigurationSettings;
import de.dlopes.stocks.facilitator.data.StockInfoImpl;
import de.dlopes.stocks.facilitator.data.StockInfoRepository;
import de.dlopes.stocks.facilitator.services.StockDataCollector;

@Controller
public class HomeController {

	@Autowired
	ConfigurationSettings cs;

	@Autowired
	StockInfoRepository siRepo;

	@RequestMapping("/secured/home")
        public String home(Model model) {

		List<StockInfoImpl> siList = siRepo.findAll();
		model.addAttribute("stocks", siList);

		return "home";

        }

	@RequestMapping("/secured/stocks/update")
	public String update(Model model) {

		StockDataCollector dataCollector = cs.getDataCollector();
		List<StockInfo> siList = dataCollector.getData();

		for (StockInfo si : siList) {
			siRepo.save((StockInfoImpl) si);
		}
		siRepo.flush();

		// reload homepage with updated values again
		return home(model);
        }


}
Here is what we did:
- We let the Spring Framework do all the hard work for us and simply injected our new repository class in the HomeController (see line 23).
- Furthermore we changed the implementation of the home() method to load the stocks from the repository instead of the data collector. This is simply achived by means of the implicitly provided method findAll() (see line 28).
- Finally, we introduced the method update() and made it availabel underneath the context path "/secured/stocks/update". This method loads the data from our StockDataCollector implementation and then stores it's results in the repository now (see lines 35 - 48). For storing the data the methods save() and flush() are applied.
As we don't want to store only our stock data in the database we will change the SecurityConfig class once more to utilize the in memory database provided by the application:
package de.dlopes.stocks.facilitator.security;

import javax.sql.DataSource;

import org.springframework.beans.factory.annotation.Autowired;
import org.springframework.security.config.annotation.authentication.builders.AuthenticationManagerBuilder;
import org.springframework.security.config.annotation.web.builders.HttpSecurity;
import org.springframework.security.config.annotation.web.configuration.EnableWebSecurity;
import org.springframework.security.config.annotation.web.configuration.WebSecurityConfigurerAdapter;

import de.dlopes.stocks.facilitator.config.ConfigurationSettings;

@EnableWebSecurity
public class SecurityConfig extends WebSecurityConfigurerAdapter {

	// DataSource is already defined automatically by Spring Boot
	// This datasource points to a H2 database in a local environment but in the
	// cloud environment it's bean definition gets automatically rewritten by Spring's
	// Cloud Foundry Connector to a relational SQL database (ElephantSQL in our case)
	// and is bound to the corresponding cloud service
	@Autowired
	private DataSource dataSource;

	@Autowired
	private ConfigurationSettings config;

	@Override
	protected void configure(HttpSecurity http) throws Exception {
		http.authorizeRequests()
				// allow access to styles, images and the index page to everybody
				.antMatchers("/css/**", "/img/**", "/index.html").permitAll()
				// restrict secured area to users with a certain role
				.antMatchers("/secured/**").hasRole(config.getDefaultRole())
				.and()
			.formLogin()
				// set login and logout page
				.loginPage("/login").failureUrl("/login-error");
	}

	@Autowired
	public void configureGlobal(AuthenticationManagerBuilder auth) throws Exception {
		auth.jdbcAuthentication()
			.dataSource(dataSource) // points this config to datasource provided by Spring
			.withDefaultSchema()	// returns Jdbc-based userDetailsService
			.withUser(config.getDefaultUser()) // set username
			.password(config.getDefaultPassword()) // set password
			.roles(config.getDefaultRole()); // assign user role
	}

}
All we have to do, is to inject the data souce (see line 22), change the authentication type (see line 42) and use the injected datasouce for the generation of a JDBC-based userDetailsService (see lines 43 and 44). Right now, this doesn't seem to be necessary because we have stored the the user credentials in an in-memory database before as well. The reason why we did it anyways: we have now more control over the source of the user credentials to match against. This will be important in the next session (see below).
The only thing that is still missing is a possiblity to invoke the loading mechanism of stocks information by our application. That's why we add a link to the template home.html (underneath /src/main/resources/templates):
	<div class="content" style="float:left" th:switch="${#lists.isEmpty(stocks)}">
		<p th:case="true">
			Stock info not loaded yet.
			Click <a href="#" th:href="@{/secured/stocks/update}">here</a> to refresh stock information.
		</p>
		<table th:case="*">

                <!-- further HTML code for rendering the stock info table -->
Nothing special here: we just show an indication and the link pointing to the request mapping "/secured/stocks/update" (which we have defined in the HomeController) to the user in case there is no stock information in the in-memory database yet.
Run a quick local test
Start the project as a Spring Boot Application and try it out.
1.) On navigation to http://localhost:8080 or http://localhost:8080/index you should see the default page:
2.) We you navigate to the secured area you should see the login form:
3.) When you enter the wrong user credentials then the login page is shown again with a the corresponding error message:
4.) After login with the correct user credentials (username: user/password: password), you will see the following empty page:

5.) After clicking on "here", you should be able to view the stocks information again (remember: they are loaded from the in-memory database now):
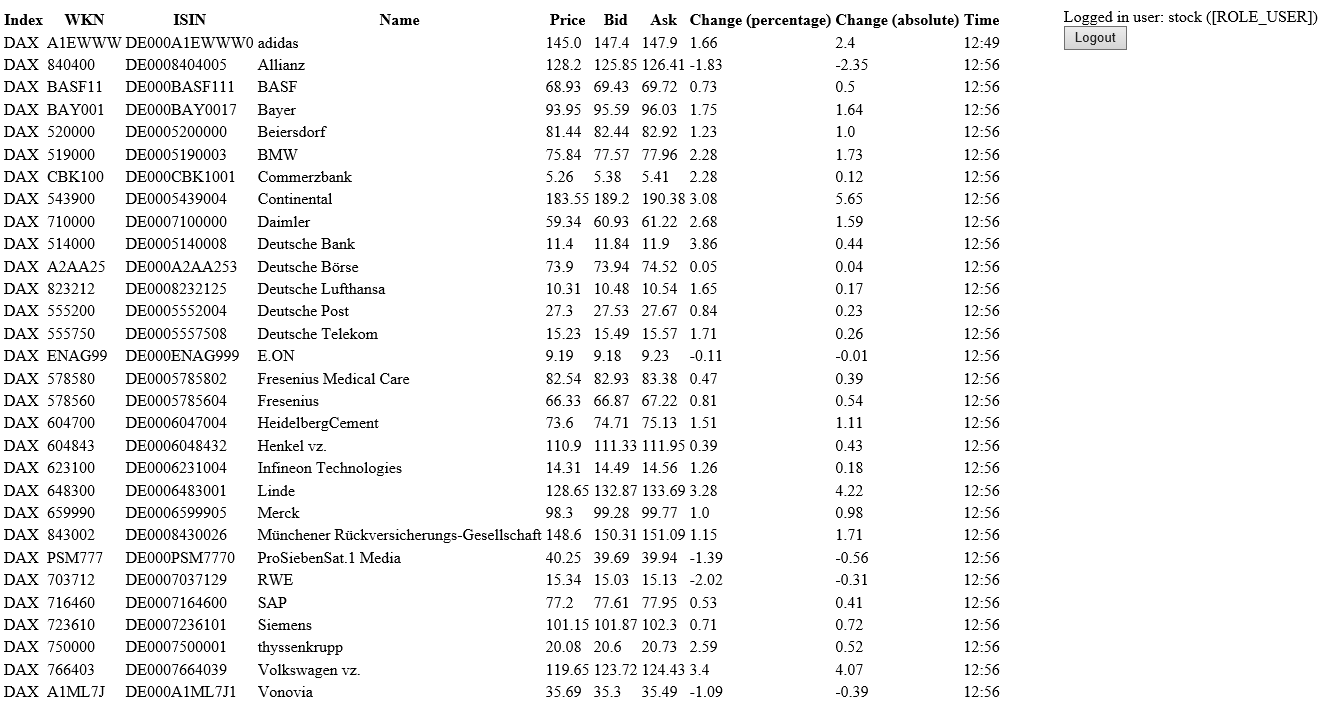
5.) If you click on the logout button, you will be redirected to the login page again:
And again I am impressed how easy that was! :)
Recap
Today, we've secured part of our application against unauthorized access based on a simple Spring Security configuration with a login and logout mechanism. Additionally we've enhanced our application already with in-memory database persistence and tied that to our security configuration.You can download the source code from my GitHub project page again: https://github.com/d-lopes/stock-facilitator/releases/tag/v0.3
Our current high-level component based view of the application has changed again:
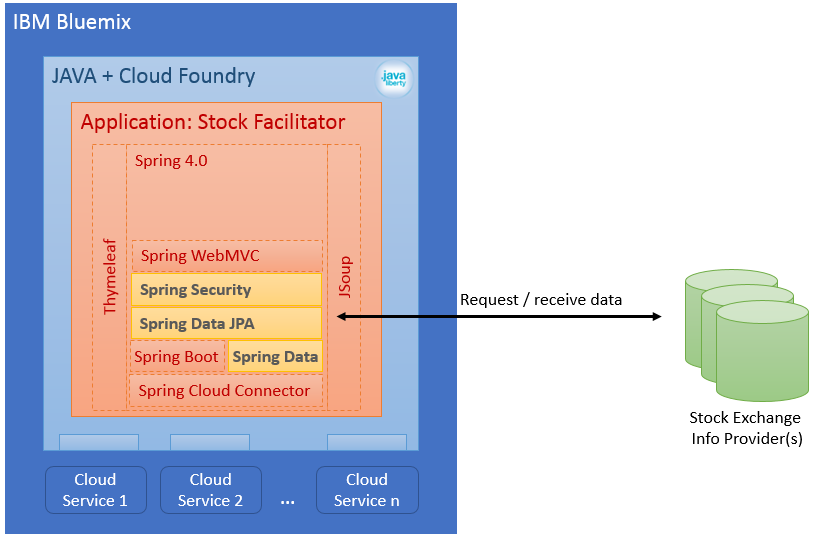
In the next session we will configure the application to shift form the in-memory database to a database service provided by the cloud environment.
This tutorial was inspired by the following sources:
- http://docs.spring.io/spring-security/site/docs/current/guides/html5/helloworld-boot.html
- https://github.com/thymeleaf/thymeleaf-extras-springsecurity
- http://docs.spring.io/spring-security/site/docs/4.1.1.RELEASE/reference/htmlsingle/#jc-authentication-jdbc
- https://dzone.com/articles/12-factor-app-style-backing
associated Tags:
About me

Dominique Lopes is a Senior SAP Consultant at MHP with more than 10 years experience in Software Development in various programming languages. In his leisure time he enjoys to try out new IT trends in his private software projects.