Projects
Developing professional software (at no cost)
Written by Dominique Lopes- have a brief look at GitHub - our source code repository, ...
- learn how to leverage Travis CI as tool for continuous integration, ...
- setup Coveralls to publish test coverage statistics of our application, ...
- explore the possiblities of Codenvy for maintenance of our source code in a cloud IDE
Source Code Management with GitHub
Our application source code is managed in a free account on GitHub.
"GitHub is a web-based Git repository hosting service. It offers all of the distributed version control and source code management (SCM) functionality of Git as well as adding its own features. It provides access control and several collaboration features such as bug tracking, feature requests, task management, and wikis for every project.
GitHub offers both plans for private repositories, and free accounts which are commonly used to host open-source software projects. As of April 2016, GitHub reports having more than 14 million users and more than 35 million repositories, making it the largest host of source code in the world." - from Wikipedia, the free encyclopedia
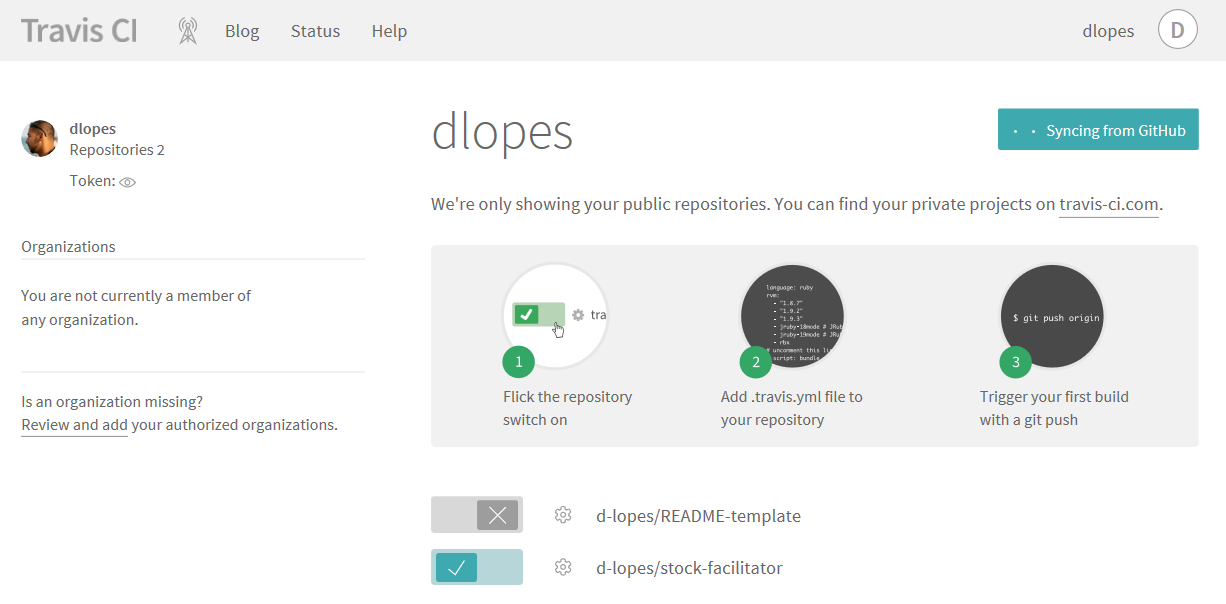
Continuous Integration with Travis CI
Once you are logged in, you can add one or more repositorys in Travis CI:
###############################################################################
# Copyright (c) 2016 Dominique Lopes.
# All rights reserved.
#
# This Source Code Form is subject to the terms of the Mozilla Public
# License, v. 2.0. If a copy of the MPL was not distributed with this
# file, You can obtain one at http://mozilla.org/MPL/2.0/.
#
# Contributors:
#     Dominique Lopes - initial API and implementation
###############################################################################
language: java
jdk:
- oraclejdk8
# would just use default install/script but the ./mvnw script errors on travis
# thus the install script was redefined. obviously this only works for maven builds right now...
install:
- mvn install -DskipTests=true -Dmaven.javadoc.skip=true -B -VTest coverage statistics with Coveralls
Unit tests are fine but the bare numbers can't give you confidence that your application really works - even if all unit tests run successfully. Only when you consider the successful unit tests together with the test coverage, you gain actual insight about the robustness and reliability of your application.
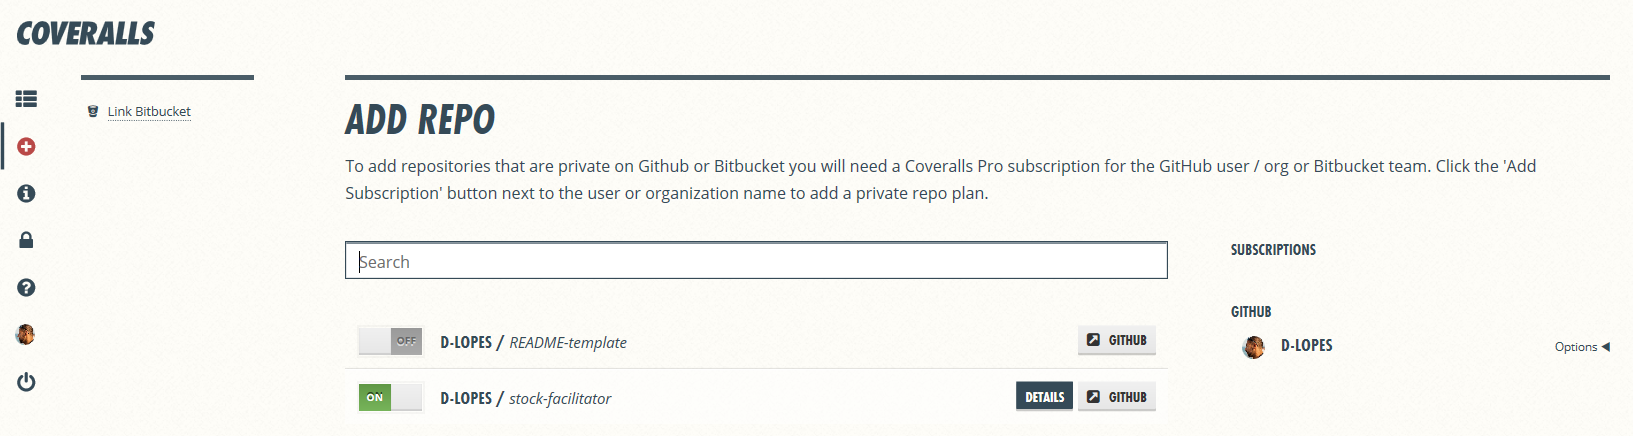
Coveralls shows which parts of your code aren’t covered by your unit tests. This gives you a first indication for missing unit tests or test cases in your software development.
Similar to GitHub and Travis CI, Coveralls is free for open source repositories and does not need the creation of an dedicated Coveralls account. You can directly sign in with your GitHub (or Bitbucket) account on the Coveralls homepage: https://coveralls.io/sign-in
Coveralls relies on code coverage reports generated by JaCoCo. Therefore we need to extend our pom.xml to include the coveralls-maven-plugin and the jacoco-maven-plugin. The jacoco-maven-plugin allows basic functionality to create the java code coverage reports. The coveralls-maven-plugin submits these java code coverage reports to the Coveralls web service.
A repository token (generated in Coveralls) has to be specified in order to help the Coveralls web service assigning the coverage results to the right repository:
<!-- test coverage plugins -->
            <plugin>
			    <groupId>org.eluder.coveralls</groupId>
			    <artifactId>coveralls-maven-plugin</artifactId>
			    <version>4.3.0</version>
			    <configuration>
			        <repoToken>Rv2XHO9sQ2BQ2YSUBMNR4VWRV9QsQ0sB2</repoToken>
			    </configuration>
			</plugin>
			<plugin>
			    <groupId>org.jacoco</groupId>
			    <artifactId>jacoco-maven-plugin</artifactId>
			    <version>0.7.7.201606060606</version>
			    <executions>
			        <execution>
			            <id>prepare-agent</id>
			            <goals>
			                <goal>prepare-agent</goal>
			            </goals>
			        </execution>
			    </executions>
			</plugin>
Additionally, the .travis.yml file has to be adjusted once more in order to tell Travis CI to generate the java code coverage reports and upload it to Coveralls after the application has been build:
script:
- mvn clean test jacoco:report coveralls:report
With this setup, we are finally able to manage our source code in GitHub, receive our test results from regression tests automatically and can make changes with confidence because we know about our test coverage.
Hint: there are of course a lot more details to a test concept - e. g. negative tests, boundary tests, performance tests, load testing etc. - which can't be solved soley with this setup. Those aspects need to be incorporated in the unit tests if possible or have to be carried out by special tools.
Development in a cloud IDE Platform
While the source code management, continous integration services, test results and test coverage statitics and even the test system (IBM Bluemix inlcuding database) for our application are entirely hosted in the cloud, there is one component left in our development infrastructure which remained a local application so far - the IDE. Wouldn't it be cool to "virtualize" even that component and enable ourselves to develop based on the same evironment from everywhere?
Well, that is possible now - at latest since the introduction of Ecliple Che.
"Eclipse Che is an open-source Java based developer workspace server and cloud integrated development environment (IDE) which provides a remote development platform for multi-user purpose. The workspace server comes with a RESTful webservice and provides high flexibility. It also contains a SDK which can be used to create plug-ins for languages, frameworks or tools. The main difference between Eclipse Che and the standard Eclipse IDE is its ability to create Docker containers to execute applications." - from wikipedia, the free encyclopedia
Although Eclipse Che is similar to the popular Eclipse IDE and is developed as top-level project at the eclipse foundation, there are a couple of differences between the two:
- one Eclipse Che instance can be installed on a remote server and is used by many developers
- Eclipse Che can be run as SaaS and thus there is only one version of it at a time - but it comes with a lot of supported languages and frameworks
- Eclipse Che can be accessed from any device via a common browser.
- Currently, Eclipse Che still lacks some major features which (hopefully) will be added soon (e. g. limited JAVA standard library support for auto-completion)
You should definitely keep an eye on Eclipse Che, since the main concept is awesome and it might be a vital part of the development process of the future.
You can download Eclipse Che and run it by yourself but there are also cloud workspace providers with Che at their core - as the foundation so to say.
Codenvy is a popular one out of these cloud workspace providers. It adds a whole bunch of addtional features to their cloud workspace (based on Eclipse Che). The ones that I find most fascinating are the following:
- Codenvy workspaces can be stored as a versionable Factory template that includes project definitions, environment configuration, toolchain integrations, plug-ins and policies.
- Codenvy integrates with your LDAP/AD directory, git or Subversion version control, as well as issue management and continuous integration. Nearly any stack and toolset can be integrated.
- Codenvy workspaces cam be moved to a local machine for offline editing with any IDE.
- An SSH daemon is injected into every codeenvy workspace machine, which can be used in order to connect from an existing IDE on a local machine.
- Every codenvy workspace includes a test environment which can be used to assure your code works fine.
- The test environment can be debugged so that can convinently find the root cause for occuring bugs.
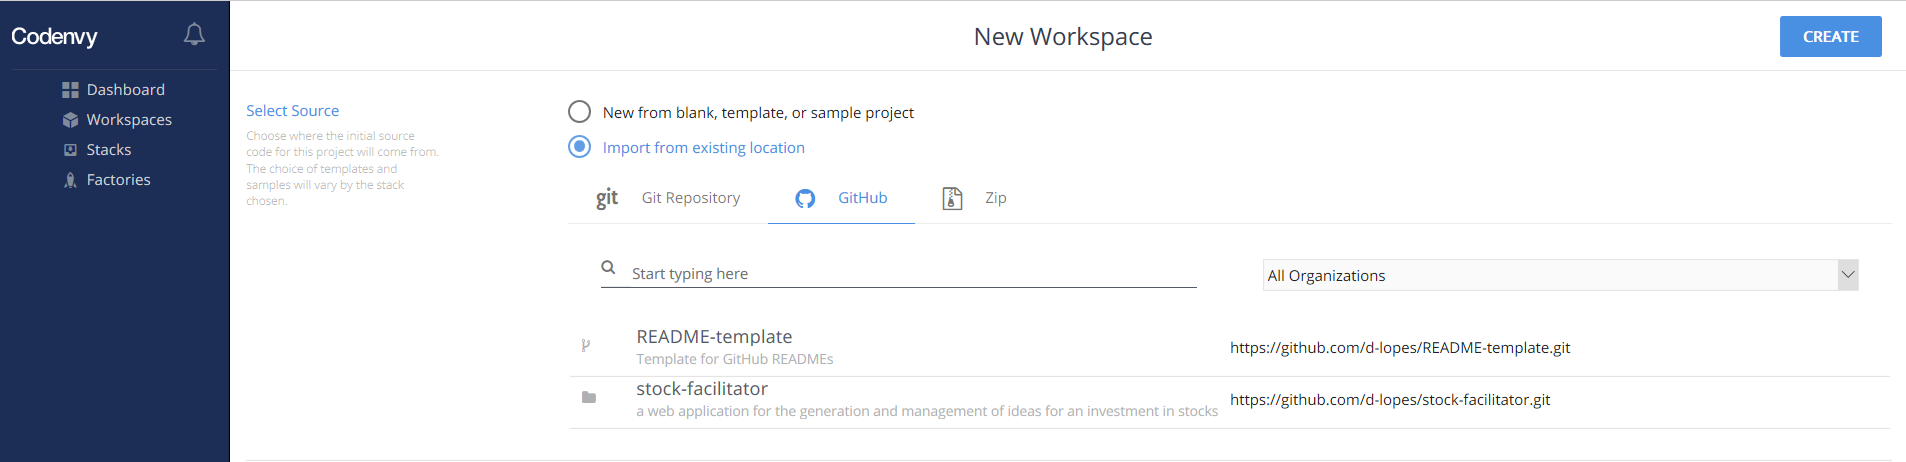
We will use Codenvy for our development process. Therefore, we go to https://codenvy.io/site/login in order to create a free account at codenvy.io. Again, you can directly sign in with your GitHub account. As a first step, we need to setup our workspace. Therefore, we choose the stock-facilitator project from our GitHub repository as initial source code for the Codenvy project:
Addtionally, we select the JAVA stack (based on Ubuntu; including maven, git and a tomcat for build and testing purposes) from one of the provided development stacks:
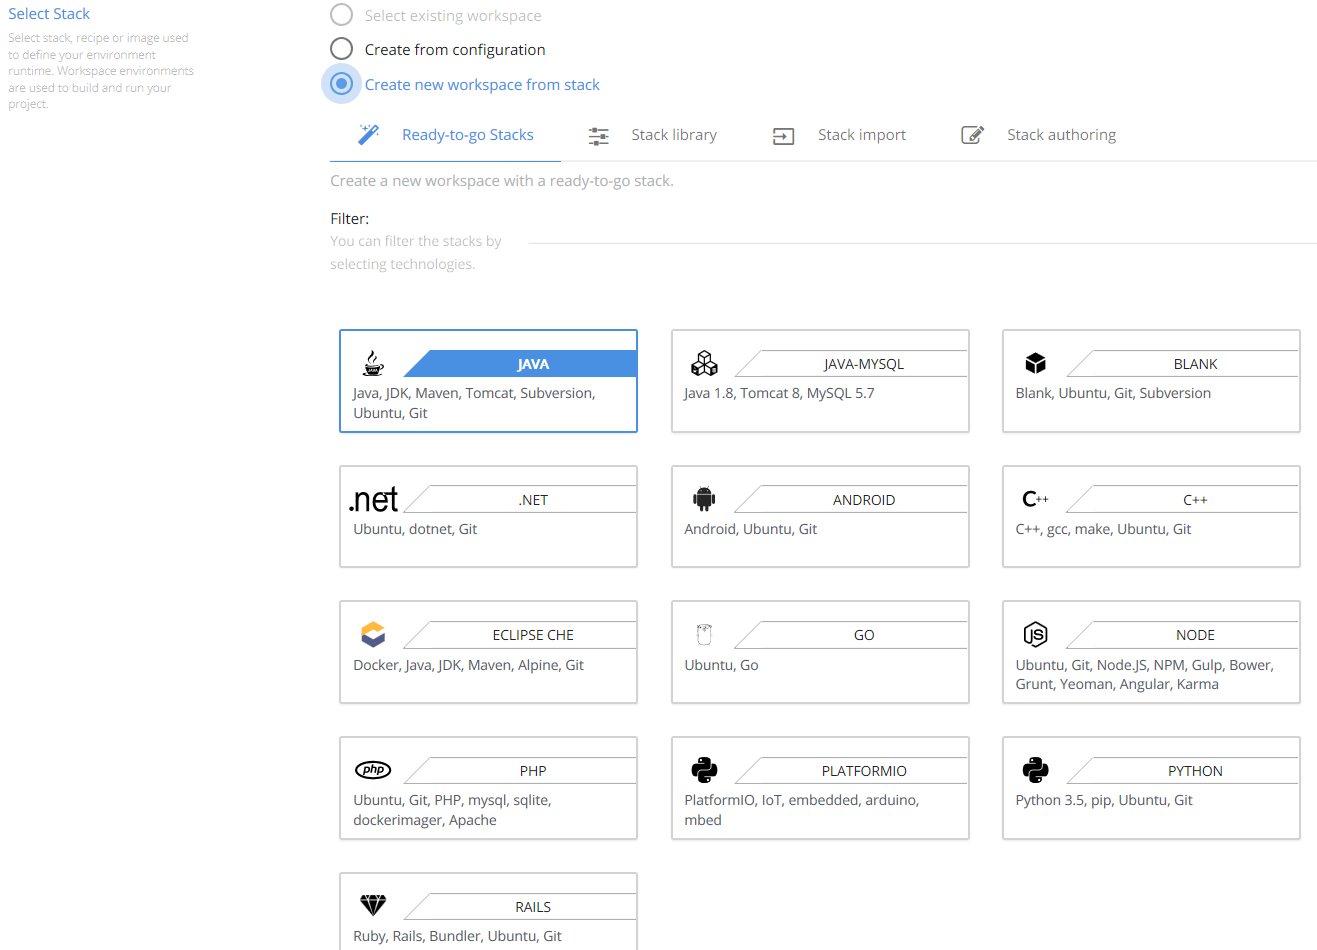
This shows the pure power of cloud workspaces: with the selection of the different stacks I could implement almost any kind of project - be it a mobile application on android or an embeded application for arduino or a web application on Node.js. We could even configure our own stack from scratch which leaves us with thousands of possiblities.
Finally, we have to provide some project metadata before we can create our workspace:

Hint: the free acount is only permitted up to 3GB RAM for its workspaces.
In our application, we make heavy use of Lombok (https://projectlombok.org/) to automatically add boiler plate code (e. g. getter and setter Methods) to our POJOs at compile time. This is a challenge for the cloud IDE, because - without further ado - getter and setter Methods for those POJOs are not available at design time (i. e. when we edit our source code). So, the cloud IDE will mark the usages of those getters and setters as compile errors. Of course, in the working application this won't be a problem because at that time Lombok is/was on the classpath and generates the "missing" boiler plate code.
Changing that is easier said then done: in a normal Eclipse IDE we would just add the following lines the corresponding eclipse.ini:
--vmArgs
 -javaagent:path/to/lombok.jar
 -Xbootclasspath/a:path/to/lombok.jar
In Codenvy, we need to get the lombok.jar on the classpath of the Che Server. I believe, we have to wrap Lombok in an Eclipse Che Plugin and expose its classes in order to provide the boiler plate code generation capabilities but i am not sure yet. Certainly, a little project for another day.
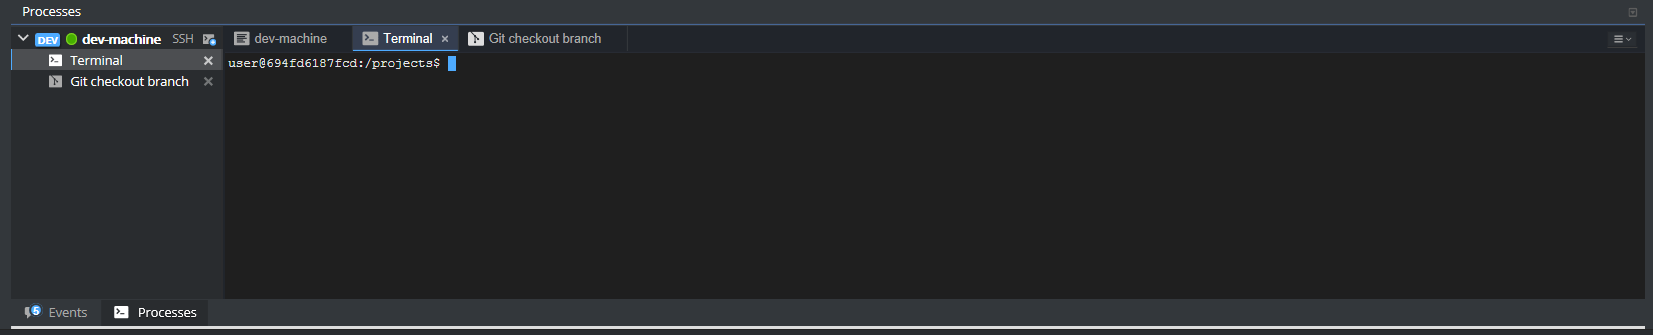
The Codenvy workspace features a terminal window which allows us to run any linux command on the underlying Ubuntu installation:
We can add some common maven and custom commands to the "CMD" drop down for convinience purposes:
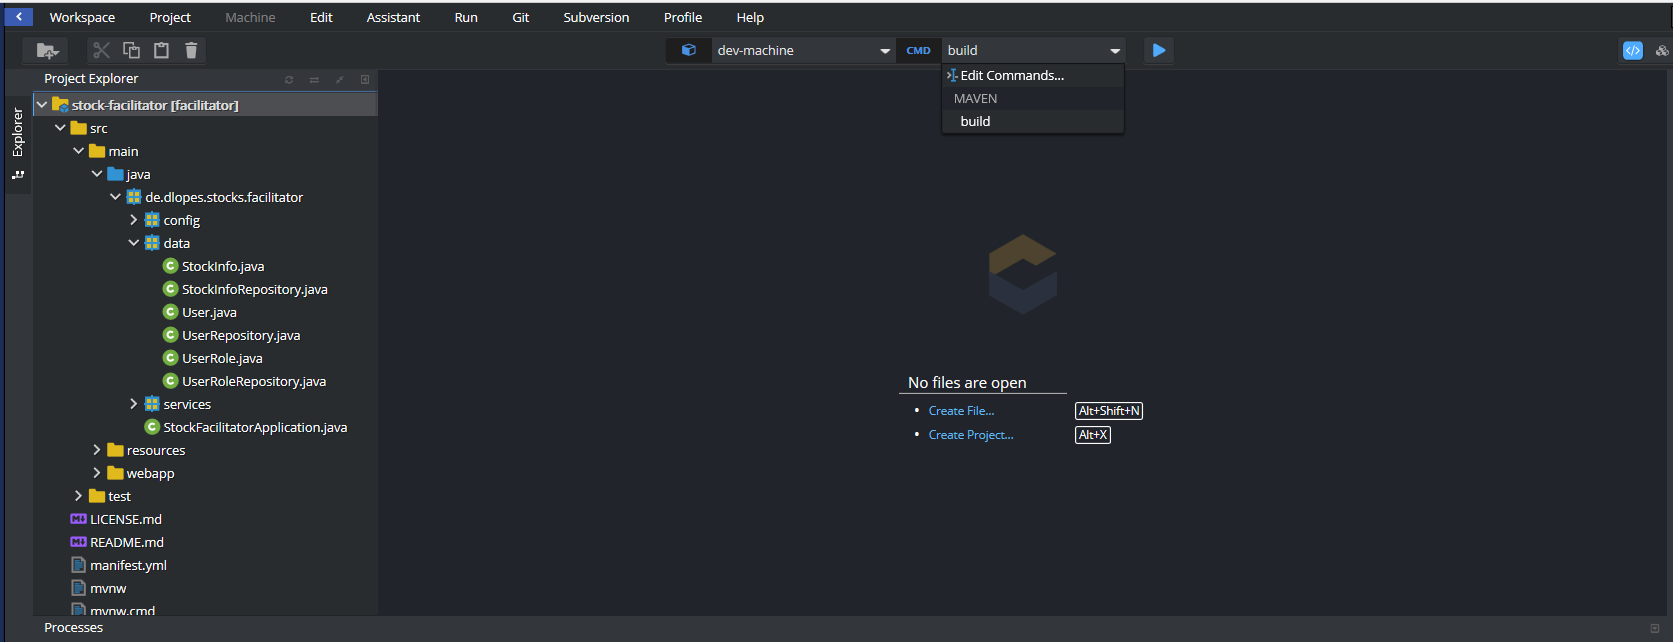
I find the following commands quite useful:
- maven:
- build: clean install
- compile: compile
- test: test
- custom:
- tomcat-debug: cd ${current.project.path} && mvn clean install -Dmaven.test.skip && cp ./target/facilitator-*.war $TOMCAT_HOME/webapps/ROOT.war && $TOMCAT_HOME/bin/catalina.sh jpda start && tail -f $TOMCAT_HOME/logs/catalina.out
- tomcat-start: cd ${current.project.path} && mvn clean install -Dmaven.test.skip && cp ./target/facilitator-*.war $TOMCAT_HOME/webapps/ROOT.war && $TOMCAT_HOME/bin/startup.sh && tail -f $TOMCAT_HOME/logs/catalina.out
- tomcat-stop: $TOMCAT_HOME/bin/shutdown.sh && echo "Tomcat stopped"
The cool thing about these commands is, that you can specify a parameterized Url to the tomcat test server that is included in our Codenvy workspace: http://${server.port.8080}/${current.project.relpath}
Unfortunately, it is still bit odd to create these commands. Especially because it is not possible to use copy-and-paste, so that your custom commands still have to be typed in - character by character (maybe something that could be improved by a future release of Codenvy).
But there is also good news: you can directly modify these commands (among other things) in your workspace configuration:
{
  "environments": {
    "default": {
      "machines": {
        "dev-machine": {
          "attributes": {
            "memoryLimitBytes": "3221225472"
          },
          "servers": {},
          "agents": [
            "org.eclipse.che.terminal",
            "org.eclipse.che.ws-agent",
            "org.eclipse.che.ssh"
          ]
        }
      },
      "recipe": {
        "location": "codenvy/ubuntu_jdk8",
        "type": "dockerimage"
      }
    }
  },
  "defaultEnv": "default",
  "projects": [
    {
      "links": [],
      "name": "stock-facilitator",
      "attributes": {},
      "type": "maven",
      "source": {
        "location": "https://github.com/d-lopes/stock-facilitator.git",
        "type": "git",
        "parameters": {}
      },
      "path": "/stock-facilitator",
      "problems": [],
      "mixins": []
    }
  ],
  "name": "StockFacilitatorWS",
  "commands": [
    {
      "commandLine": "mvn clean install -f ${current.project.path}",
      "name": "build",
      "attributes": {},
      "type": "mvn"
    },
    {
      "commandLine": "mvn -f ${current.project.path} compile",
      "name": "compile",
      "attributes": {
        "previewUrl": ""
      },
      "type": "mvn"
    },
    {
      "commandLine": "mvn -f ${current.project.path} test",
      "name": "test",
      "attributes": {
        "previewUrl": ""
      },
      "type": "mvn"
    },
    {
      "commandLine": "cd ${current.project.path} && mvn clean install -Dmaven.test.skip && cp ./target/facilitator-*.war $TOMCAT_HOME/webapps/ROOT.war && $TOMCAT_HOME/bin/catalina.sh jpda start && tail -f $TOMCAT_HOME/logs/cataline.out",
      "name": "tomcat-debug",
      "attributes": {
        "previewUrl": "http://${server.port.8080}/${current.project.relpath}"
      },
      "type": "custom"
    },
    {
      "commandLine": "cd ${current.project.path} && mvn clean install -Dmaven.test.skip && cp ./target/facilitator-*.war $TOMCAT_HOME/webapps/ROOT.war && $TOMCAT_HOME/bin/startup.sh && tail -f  $TOMCAT_HOME/logs/catalina.out",
      "name": "tomcat-start",
      "attributes": {
        "previewUrl": "http://${server.port.8080}/${current.project.relpath}"
      },
      "type": "custom"
    },
    {
      "commandLine": "cd ${current.project.path} && mvn clean install -Dmaven.test.skip && cp ./target/facilitator-*.war $TOMCAT_HOME/webapps/ROOT.war && $TOMCAT_HOME/bin/startup.sh && tail -f  $TOMCAT_HOME/logs/catalina.out",
      "name": "tomcat-stop",
      "attributes": {
        "previewUrl": "$TOMCAT_HOME/bin/shutdown.sh && echo 'Tomcat stopped'"
      },
      "type": "custom"
    }
  ],
  "links": []
}
You can find this configuration in the settings of your workspace on the dashboard. It can be saved and used as a backup for a later point in time.
With all these components the full picture of our development environment is complete now:
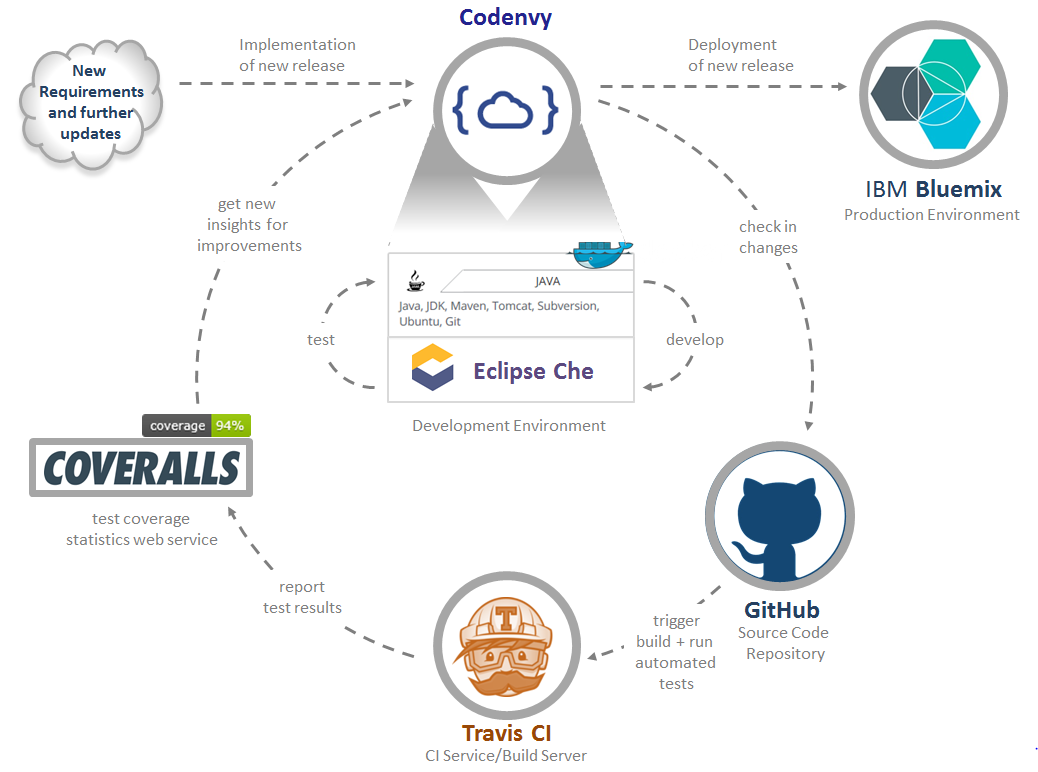
- To maintain our source code, we have now an Eclipse Che based JAVA cloud IDE in a Codenvy workspace which runs together with Maven, Git and Apache Tomcat on a Ubuntu installation in a Docker container.
- We use GitHub as source code repository to checkin and manage that source code.
- On every checkin, a new build cycle starts in Travis CI (which we use as our build server). Unit tests are run as part of each build cycle which generate test results as well as coverage statistics (the latter with JaCoCo).
- The test coverage statistics are uploaded and published on Coveralls. This can give us new insights for missing unit tests or test cases in our software solution.
Recap
Today, we have dedicated ourselves to a walk through of the current setup of my development environment (consisting of Codenvy, GitHub, Travis CI and Coveralls). This setup allows you to carry out a professional development process for JAVA and many other programming languages without a deskto pc and even without spending any money.
In the next session, we will eventually start to extend the features of our application and make it a useful tool for trading of stocks.
This blog post was inspired by the following sources:
- https://en.wikipedia.org/wiki/GitHub
- https://git-scm.com/doc
- https://en.wikipedia.org/wiki/Travis_CI
- https://coveralls.zendesk.com/hc/en-us
- http://jeroenmols.com/blog/2015/11/13/traviscoveralls/
- https://en.wikipedia.org/wiki/Eclipse_Che
- http://codenvy.readme.io/
- https://blog.oio.de/2016/05/02/eclipse-che-vs-eclipse-mars/
About me

Dominique Lopes is a Senior SAP Consultant at MHP with more than 10 years experience in Software Development in various programming languages. In his leisure time he enjoys to try out new IT trends in his private software projects.