Projects
Basic setup
Written by Dominique Lopes
In our first session we want to …
- prepare our development environment,
- create a very simple Spring.Boot based application,
- test this application in our local environment,
- setup our cloud environment (we will use IBM Bluemix) and
- deploy and run this application in the cloud
General preparations
We will need some tools to implement our little project. So, (if necessary) download the Java Development Kit – at least version 8 – and install it on your computer. You can find the official distribution from Oracle here: http://www.oracle.com/technetwork/java/javase/downloads/index.html
We want to make our live a little easier during the development phase. Thus we will need a modern integrated development environment (IDE). As our solution will be based on Spring.Boot I decided to use the Eclipse-based SpringSource ToolSuite (STS) as IDE because it provides already many aligned functionalities with Spring. You can get the latest version of the STS at https://spring.io/guides/gs/sts
Of course, you can use also a different IDE (e. g. IntelliJ or NetBeans) but keep in mind that screenshots or functionality, I’m referring to in this blog, might look or work differently for you.
As a last step for our preparation we need to download and add Lombok to the classpath for our IDE. Lombok is a nice and light-weight project that will reduce boiler-plate code and implementation efforts in our coding. If you haven’t heard of it, please have a look here: https://projectlombok.org
In order to add the lombok.jar to our classpath just download it, store it somewhere on you hard drive and run it as a java app (i.e. doubleclick it, usually).
Now we are ready to start.
Create the project
Select [New] -> [Import Spring Getting Startet Content] from the context menu of the package Explorer in order to create a new Spring Boot based JAVA Project.

Enter the project name and description, maven group and artifact ID as well as the package to store our coding and click [Next].
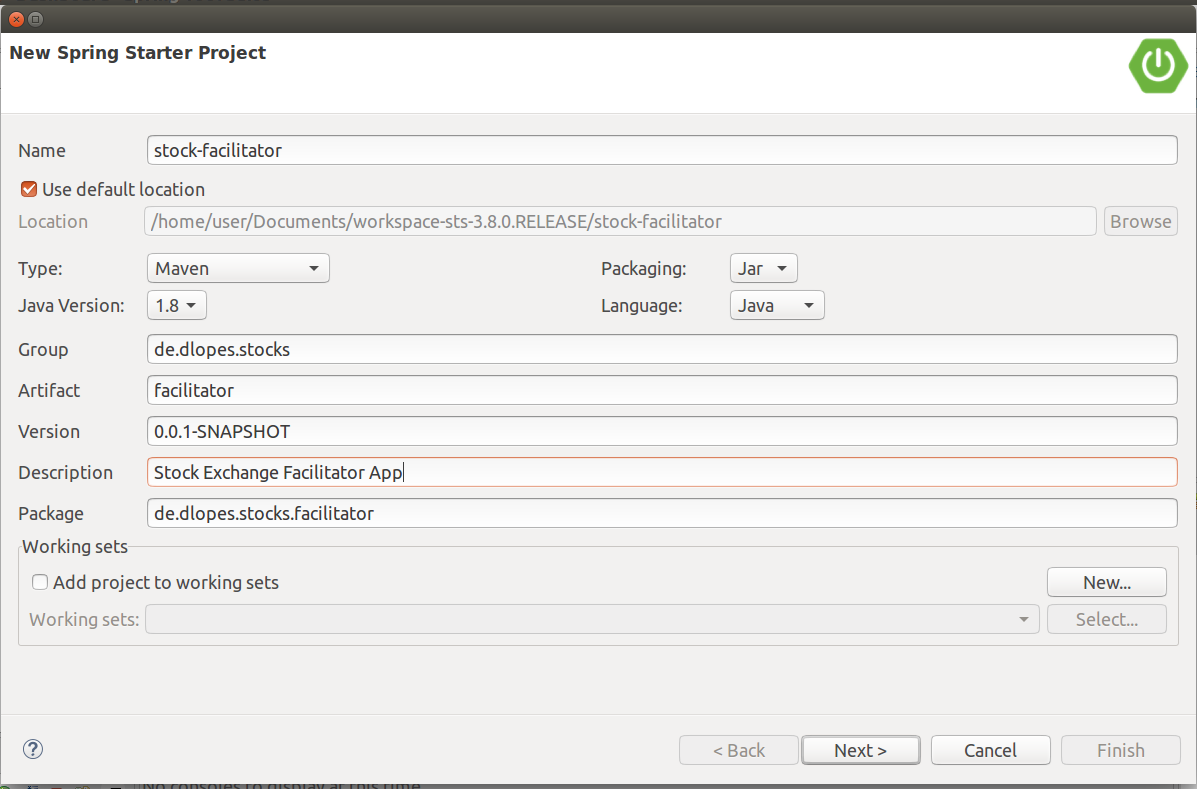
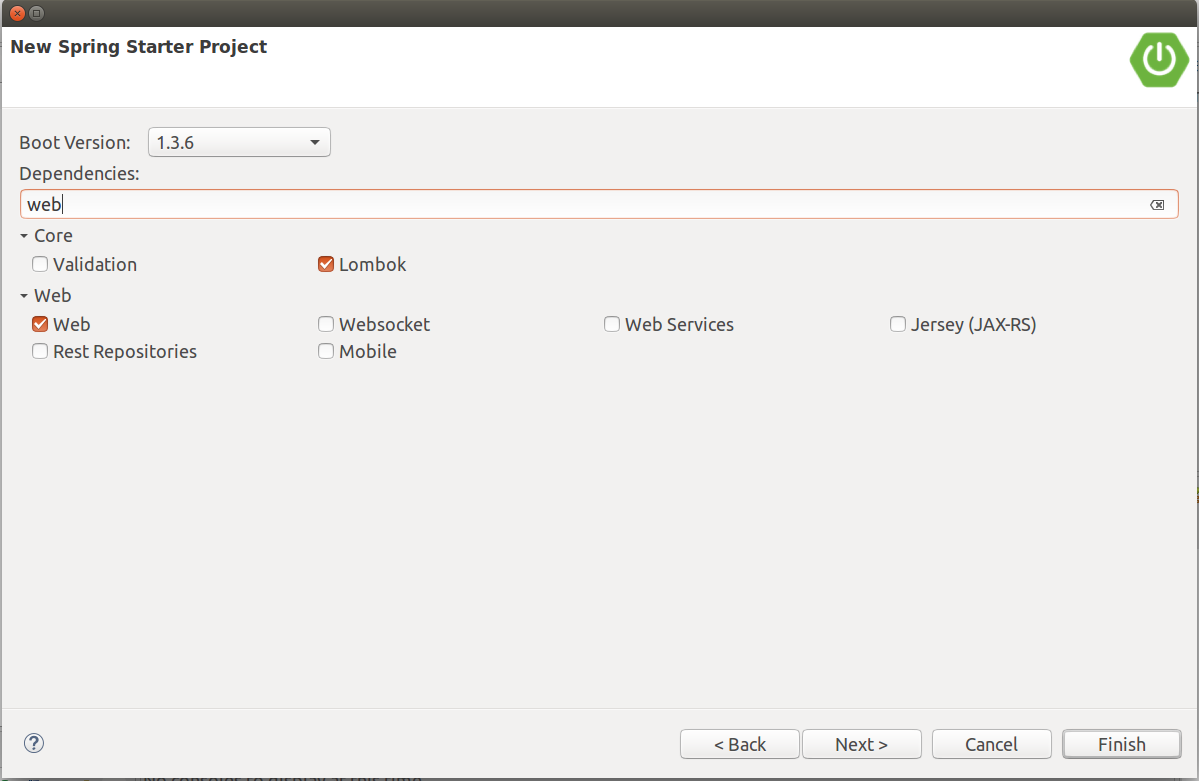
Enter the maven dependencies of the project and click [Finish]. For a start select “web” and “Lombok” (which we want to use later on).
That’s it. Our project was created.
Implement a Hello-World-style REST service
In the package explorer, navigate to the root package of the application (de.dlopes.stocks.facilitator) and create a HomeController class with the following content:
package de.dlopes.stocks.facilitator;

import org.springframework.web.bind.annotation.RequestMapping;
import org.springframework.web.bind.annotation.RestController;

@RestController
public class HomeController {

    @RequestMapping("/")
    public String index() {
        return "Relax. You are home!";
    }

}
And we are done with our application. That was easy, right? ;)
Testing the application locally
Select [Run As] -> [Spring Boot App] in the context menu of the project in the package explorer to start the application.

The console view should show something like this in its last few lines after starting the application:
2016-07-10 15:47:20.768 INFO 6382 --- [ main] s.b.c.e.t.TomcatEmbeddedServletContainer : Tomcat started on port(s): 8080 (http)
2016-07-10 15:47:20.793 INFO 6382 --- [ main] d.d.s.f.StockFacilitatorApplication : Started StockFacilitatorApplication in 11.579 seconds (JVM running for 13.485)
2016-07-10 15:50:43.115 INFO 6382 --- [nio-8080-exec-1] o.a.c.c.C.[Tomcat].[localhost].[/] : Initializing Spring FrameworkServlet 'dispatcherServlet'
2016-07-10 15:50:43.116 INFO 6382 --- [nio-8080-exec-1] o.s.web.servlet.DispatcherServlet : FrameworkServlet 'dispatcherServlet': initialization started
2016-07-10 15:50:43.162 INFO 6382 --- [nio-8080-exec-1] o.s.web.servlet.DispatcherServlet : FrameworkServlet 'dispatcherServlet': initialization completed in 46 ms
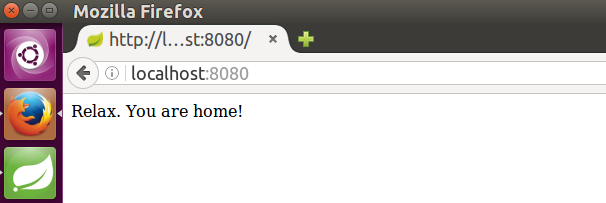
Open a brower of your choice and navigate to http://localhost:8080. Our application should generate the following output now:
Great. Now, that the app is up and running locally, we can take it a step further and deploy and test it in a cloud environment.
Setup cloud environment
There are a lot of PAAS providers out there but I decided for IBM Bluemix because it gives me (as a test user) a platform with many services and Cloud Foundry Support with a reasonable performance for free. Of course you can deploy the application also in other cloud foundry based environments from other PAAS providers. However, the following instruction in this blog entry is tailored to IBM Bluemix. If you choose something else you have to find your own way of setting up and deploying to the cloud environment of you choice.
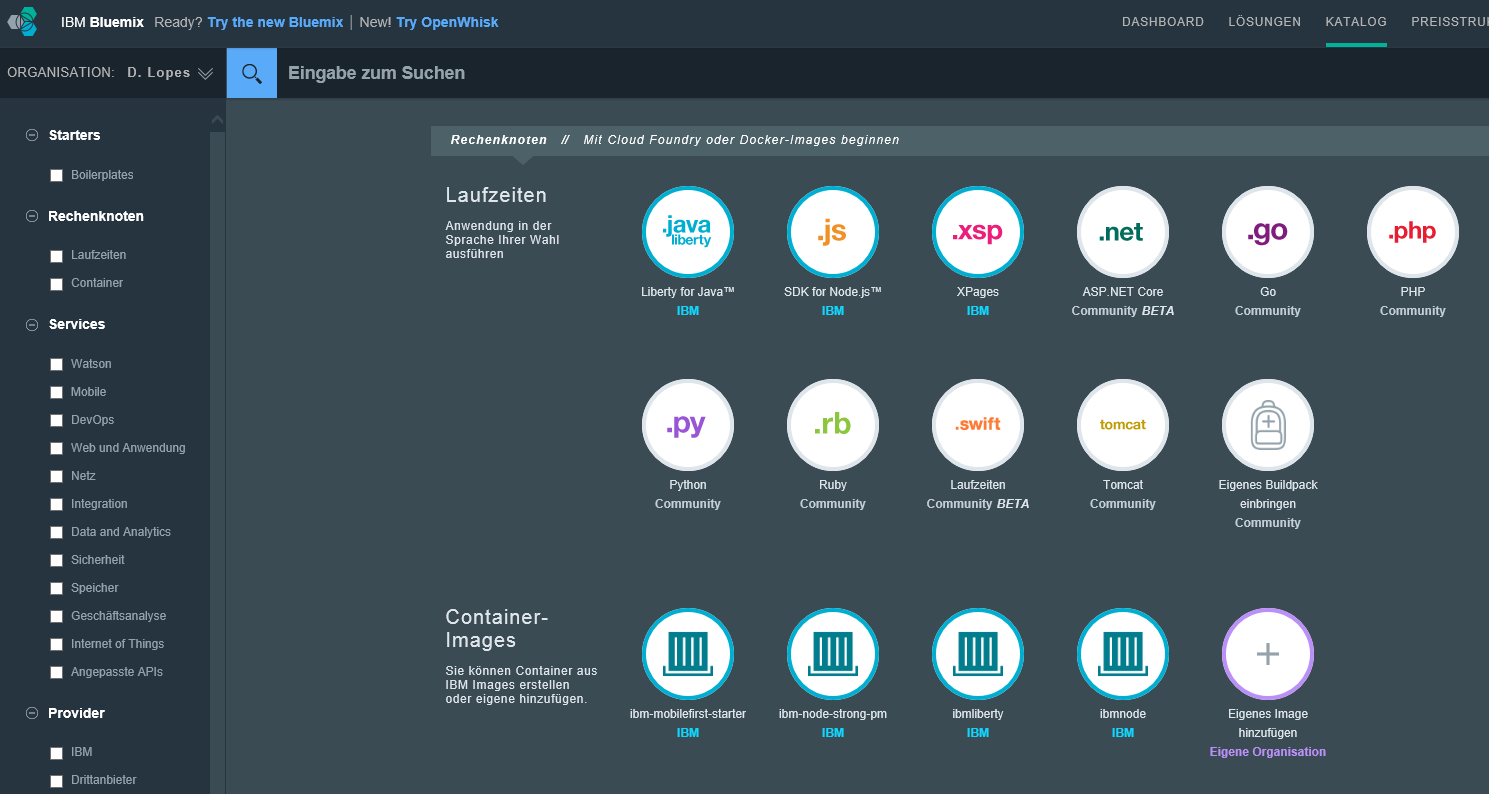
Register an IBM Bluemix account at https://console.ng.bluemix.net and login with your new account. After that, go to the catalog and create a liberty runtime (as we want to make use of cloud foundry in the future).
Choose your plan and make the necessary adjustments to its settings
To finish the setup download both – the Cloud Foundry and Bluemix CLI tools – from the following links and install them on your Computer:
- Cloud Foundry CLI: https://github.com/cloudfoundry/cli/releases
- Bluemix CLI: http://clis.ng.bluemix.net/ui/home.html
Now we can prepare our project once more and make it fit for the cloud.
Deploy application in the cloud
Add the following maven dependencies for cloud foundry to the pom.xml:
		<dependency>
			<groupId>org.springframework.cloud</groupId>
			<artifactId>spring-cloud-spring-service-connector</artifactId>
		</dependency>
		<dependency>
			<groupId>org.springframework.cloud</groupId>
			<artifactId>spring-cloud-localconfig-connector</artifactId>
		</dependency>
		<dependency>
			<groupId>org.springframework.cloud</groupId>
			<artifactId>spring-cloud-cloudfoundry-connector</artifactId>
		</dependency>
In the pom.xml, replace the packaging type with a new property ${packaging.type}.
<packaging>${packaging.type}</packaging>

<!-- ... -->

<properties>
    <!-- ... -->
    <packaging.type>jar</packaging.type>
</properties>
Additionally add a profile with the ID “war” to the pom.xml in order to be able to automatically build a web archive of our application. This archive will be deployed to the cloud environment.
<profiles>
  <profile>
      <id>war</id>
      <properties>
        <packaging.type>war</packaging.type>
      </properties>
      <dependencies>
        <dependency>
		  <groupId>org.springframework.boot</groupId>
		  <artifactId>spring-boot-starter-tomcat</artifactId>
		  <scope>provided</scope>
		</dependency>
      </dependencies>
      <build>
	    <plugins>
	      <plugin>
	        <groupId>org.springframework.boot</groupId>
	        <artifactId>spring-boot-maven-plugin</artifactId>
	      </plugin>
	      <plugin>
            <artifactId>maven-clean-plugin</artifactId>
            <version>2.5</version>
            <executions>
              <execution>
                <id>auto-clean</id>
                <phase>initialize</phase>
                <goals>
                  <goal>clean</goal>
                </goals>
              </execution>
            </executions>
          </plugin>
	</plugins>
    </build>
  </profile>
</profiles>
The spring starter dependencies usually include a tomcat webserver which we need when we run the Spring Boot application in our local environment. But we don’t need that in the cloud. That’s why the profile from above sets the scope of this specific dependency to provided (in line 70) so that it will not be included in our web archive.
Now we are ready to deploy our application. Open a shell or command line window (depends on your operating system) and package the web archive for upload to IBM Bluemix.
Upload the web archive to IBM Bluemix (of course you have to use your own user credentials and project settings here).
$ bluemix login -u This email address is being protected from spambots. You need JavaScript enabled to view it. -o "D. Lopes" -s "Stock Facilitator"
$ cf push "Stock Facilitator" -p target/facilitator-0.0.1-SNAPSHOT.war
Observe the information posted in the shell or command line. It can take a while until the application is fully deployed and up and running. Once the whole process is done you should see the following line in the shell or command line.
instances: 1/1
usage: 512m x 1 instances
urls: stock-facilitator.mybluemix.net
last uploaded: Wed Jul 10 21:43:15 UTC 2016
stack: cflinuxfs2
buildpack: java_buildpack
#0 running 2016-06-10 09:43:15 PM 0.0% 0 of 1G 0 of 1G
Open the IBM Bluemix webpage in a web browser of your choice and navigate to the cloud application. You should see something like this now:
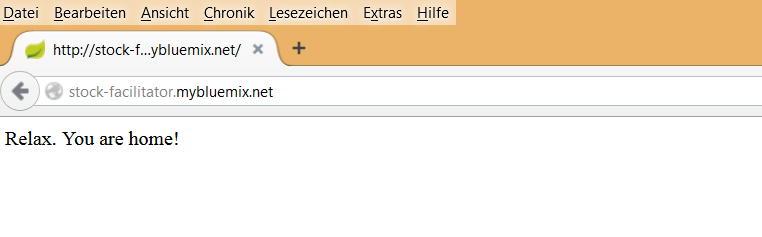
Done. Our application runs now in the cloud.
Update 04.09.2016: After various uploads of updated application versions, I figured that it is helpful to use some kind of automation that minimizes the efforts, error-proneness and the manual steps that comes with this final step. So I implemented the following small bash script (which does all the above steps after another):
#!/bin/bash
if [ "$2" = "" ]
then
echo USAGE:
echo " push2bluemix.sh -v [packageVersion]"
echo " packageVersion - version of current maven artifact to upload (defined in pom.xml)"
else
path="target/facilitator-$2-SNAPSHOT.war"
echo "building $path ..."
mvn package -P war
bluemix api https://api.ng.bluemix.net
bluemix login -u This email address is being protected from spambots. You need JavaScript enabled to view it. -o "D. Lopes" -s "Stock Facilitator"
echo "uploading $path ..."
cf push "Stock Facilitator" -p $path
fi
This script can be simply called from the project directory as follows:
It will be included from version v0.4 of the application on my GitHub project page.
Recap
We have implemented a Spring Boot based application that can run locally and in the cloud. Of course this was only a very basic application which will be further enhanced in future blog entries. You can download the source code from my GitHub project page: https://github.com/d-lopes/stock-facilitator/releases/tag/v0.1
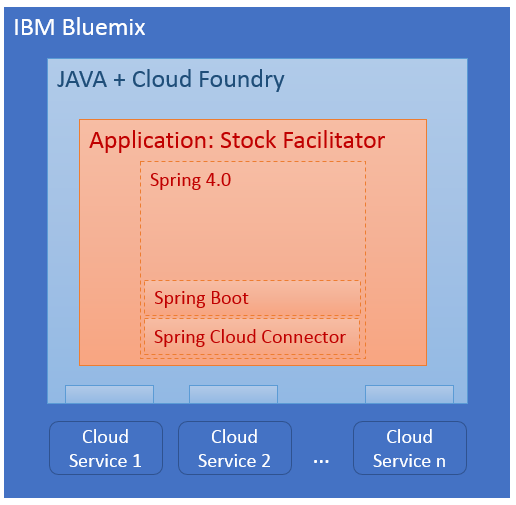
A current high-level component based view of the application looks like this:
In the next session we will add some real coding to the application.
This tutorial was created based on the following sources:
- http://projects.spring.io/spring-boot/#quick-start
- http://ryanjbaxter.com/2015/02/02/deploying-spring-boot-apps-to-bluemix-with-spring-cloud-connectors/
associated Tags:
About me

Dominique Lopes is a Senior SAP Consultant at MHP with more than 10 years experience in Software Development in various programming languages. In his leisure time he enjoys to try out new IT trends in his private software projects.